The blow guide will help you navigate and set up your website settings. Everything you need to manage your websites. Add, manage, and delete your websites.
My website settings
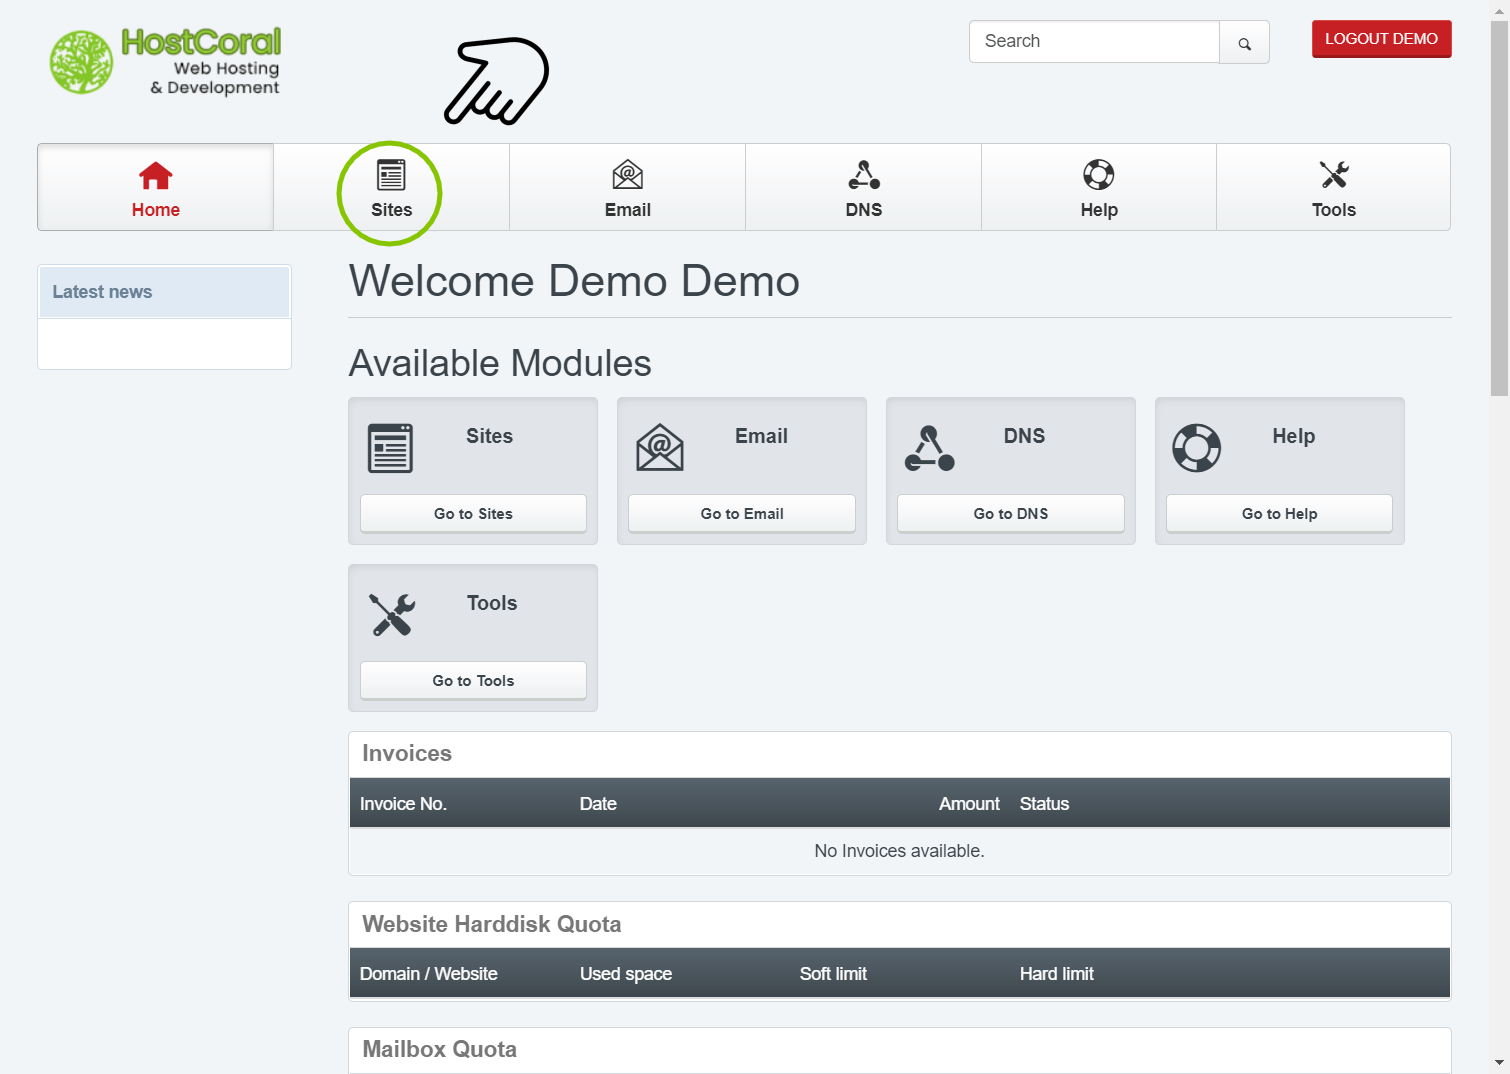
- Dashboard – To get started, login here to your control panel. After logging in, click on the “Sites” tab/button at the top of your dashboard.

- Dashboard – To get started, login here to your control panel. After logging in, click on the “Sites” tab/button at the top of your dashboard.
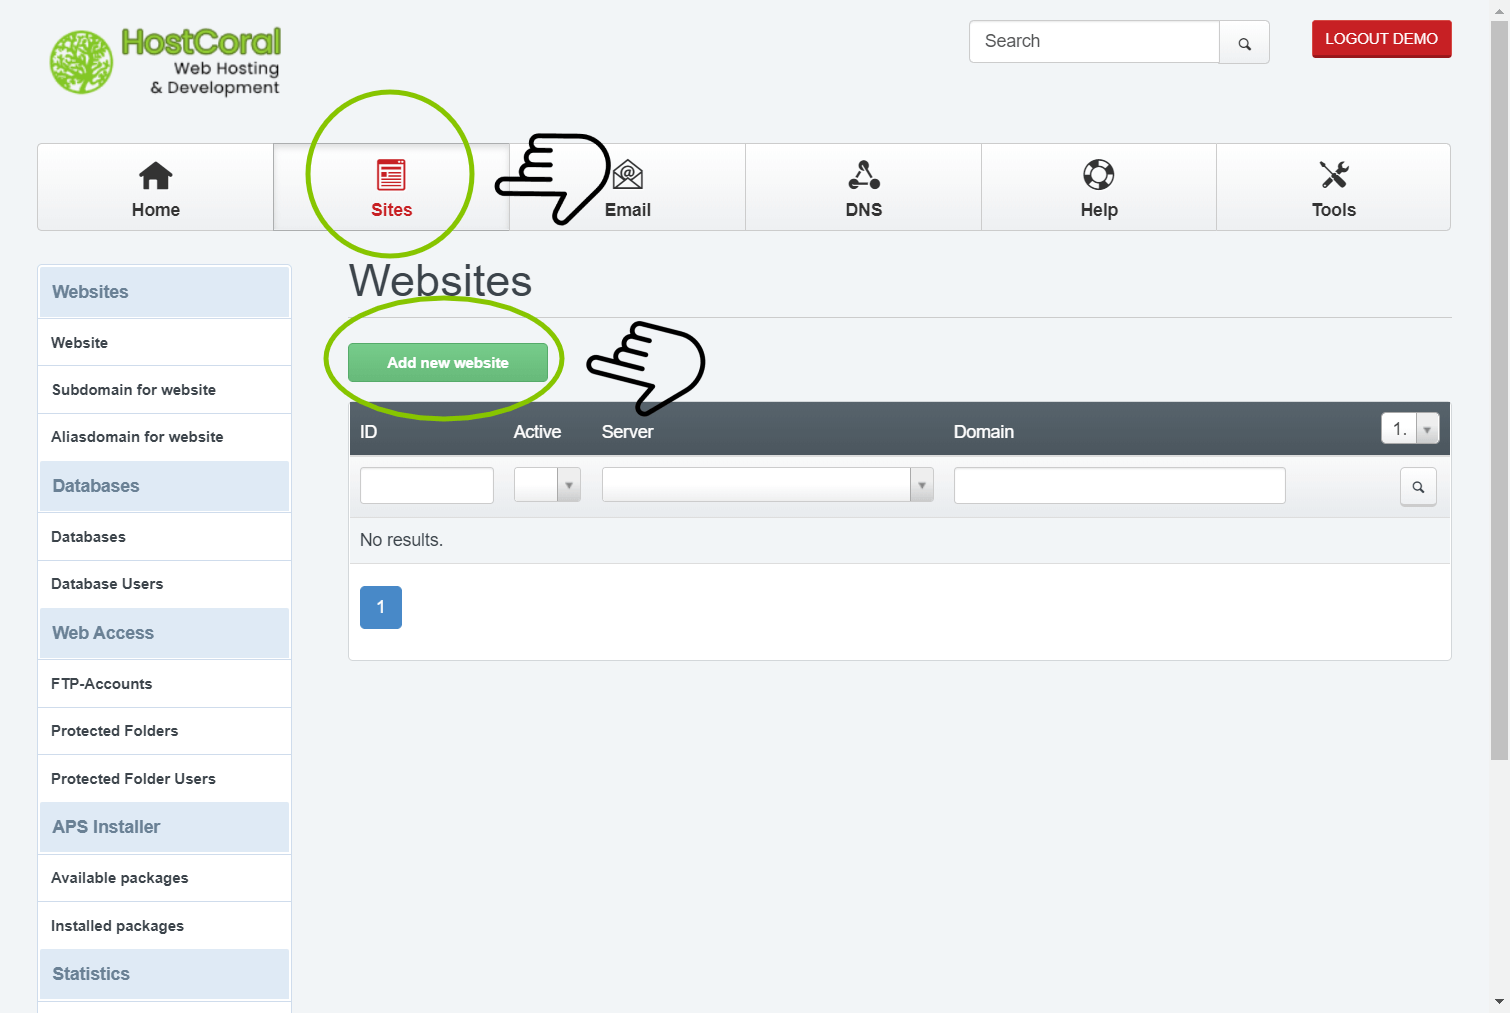
2. Sites – Click on the “add new website” button to get started setting up your new website.
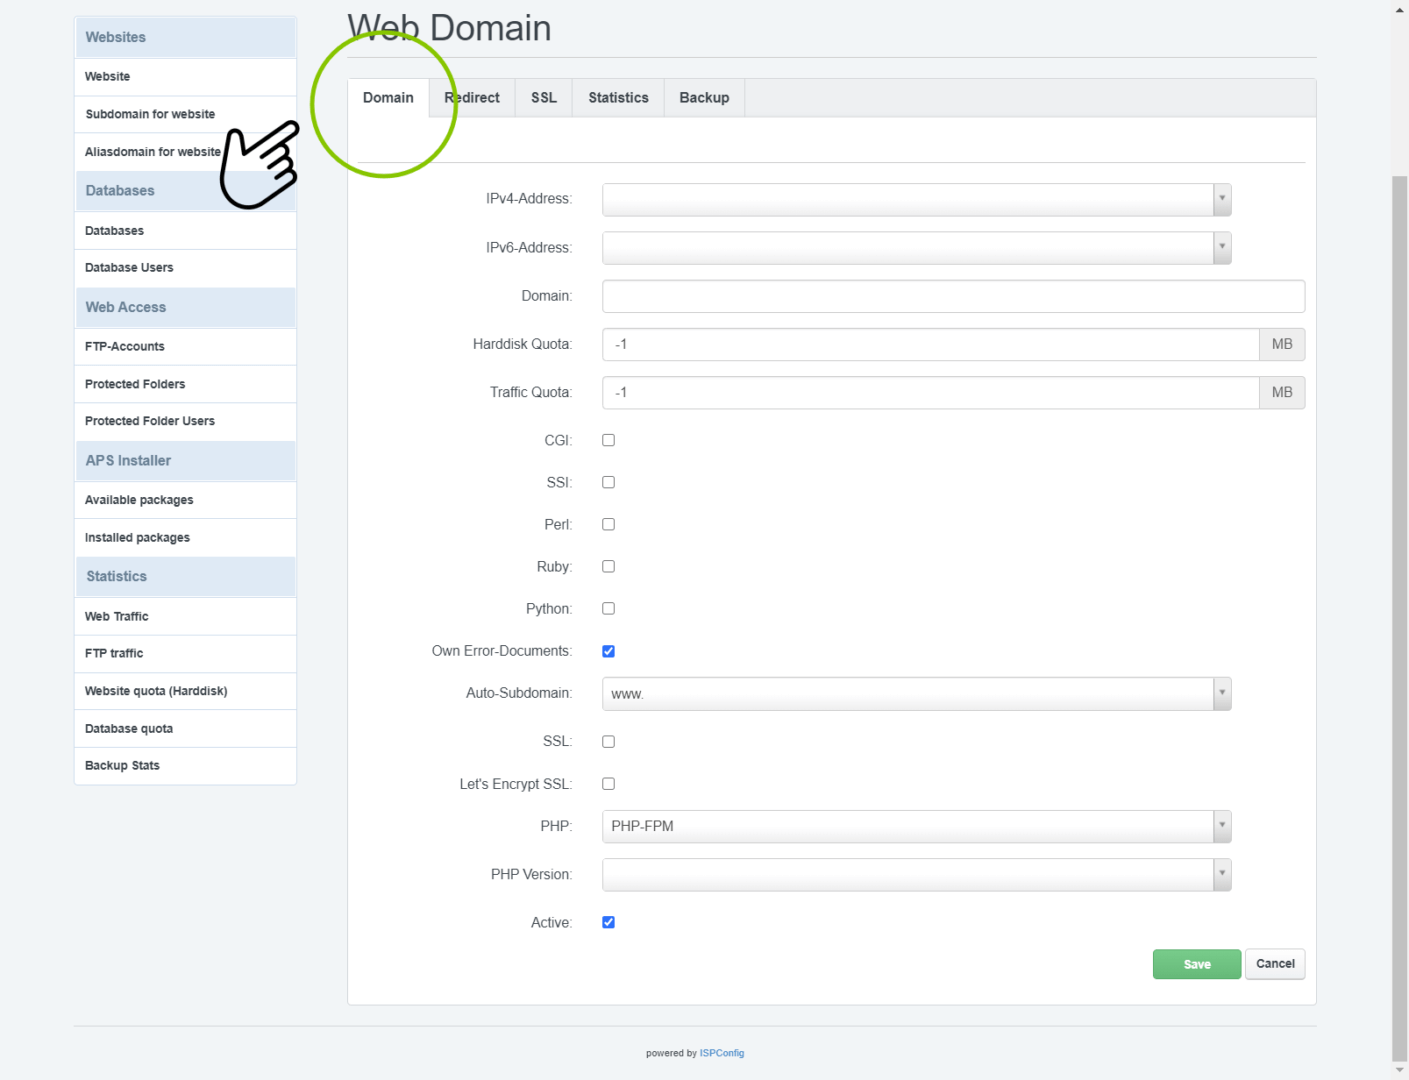
3. Domain
- IPv4-Address – This is default “*” and should remain as is
- IPv6-Address – This field should be left empty
- Domain – Fill in the address of the website you are trying to add, example; “mywebsite.com”. make sure to exclude all white spacing
- Harddisk Quota – This field should be left as is
- Traffic Quota – This field should be left as is
- Own Error-Documents : Uncheck if your website has its own error page. If checked , your website will display NGINX’s default 404 page
- Auto-Subdomain : This field is set to “www” and is recommended to leave as is
- SSL : If this field is available (dependent on your package) , check to enable SSL certificate
- PHP : The default option should be PHP-FPM
- PHP Version : Select default or choose the latest version from the list
- Active : Make sure this option is checked. If unchecked your website will not be available
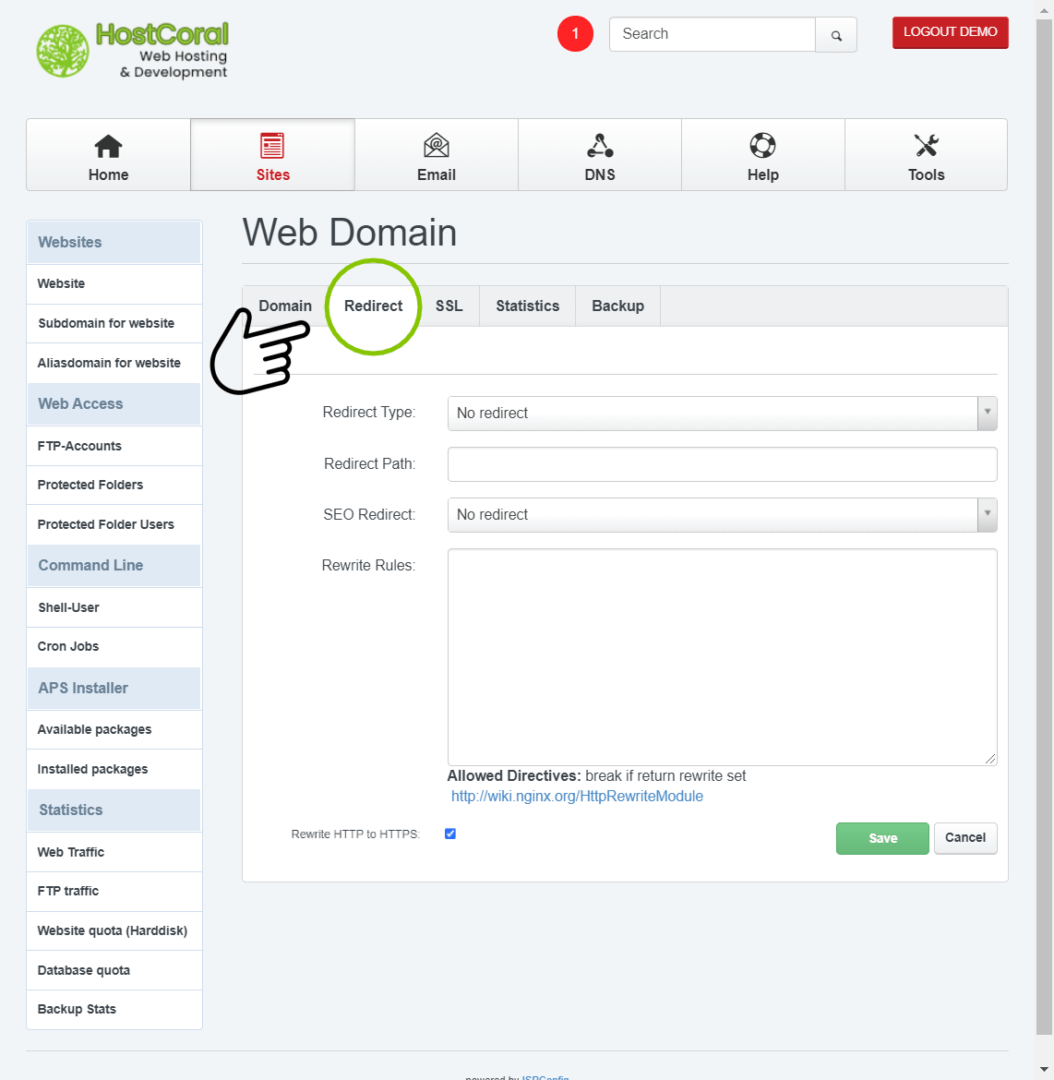
4. Redirect
- Redirect Type – Select a redirect type if your website is simply just a redirect. “No redirect” by default
- Redirect Path – Fill in your alternate website’s full path, example ; “https://otherwebsite.com”. Empty by default
- SEO Redirect – Select an SEO redirect to let browsers know the type of redirect you are implementing. “No redirect” by default
- Rewrite Rules – Add your own custom rewrite rules needed for your website. Empty by default
- Rewrite HTTP to HTTPS – If your website is available and has a valid certificate, check this option to make sure all your website links are set to https. Do not enable if your website is not accessible. To set up your SSL certificate, take a look at step 5
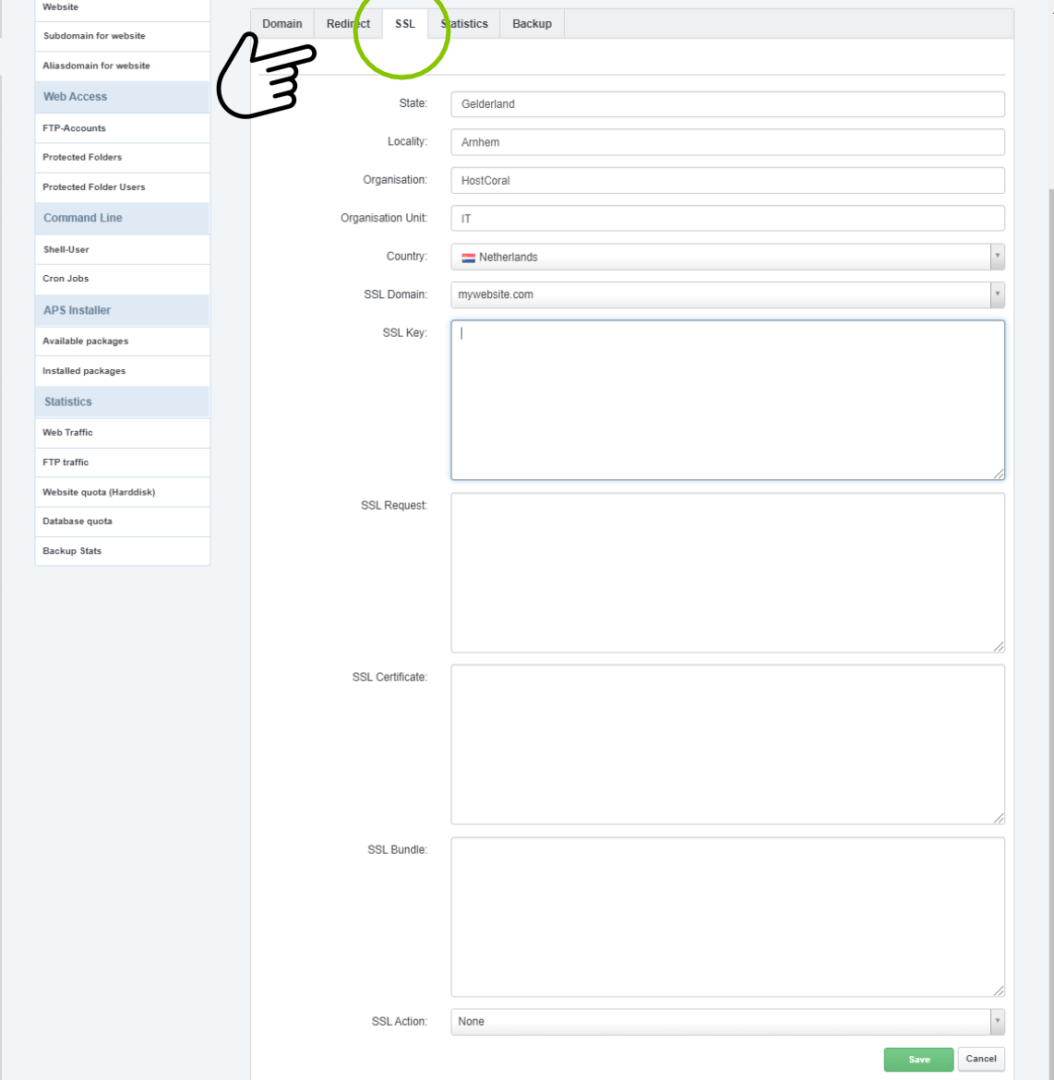
5. SSL
Note! This should only be used if you wish to manually install a premium or special type of SSL certificate. A standard SSL is included for each website for free with all web hosting packages. If you are unsure about this, please contacts us.
- State – Fill in your current state
- Locality – Fill in your city name
- Organisation – Fill in your website’s business name
- Organisation Unit – Fill in the branch of your business that manages your website. For example; IT.
- Country – Fill in the country of your website
- SSL Domain – Select your website’s SSL valid urls, default for “mywebsite.com” , “www.mywebsite.com” for www version only and “*.mywebsite.com” for subdomains
- SSL Key – If you bought or created your own SSL certificate, fill in the SSL Key you received
- SSL Request – If you bought or created your own SSL certificate, fill in the SSL request you received
- SSL Certificate – If you bought or created your own SSL certificate, fill in the SSL Certificate you received
- SSL Bundle – If you bought or created your own SSL certificate, fill in the SSL Bundle you received.
- SSL Action – Save, Create, or Delete your current certificate. Do not use the create certificate for live websites. To create an SSL certificate for a live site, see step 3 (domain)
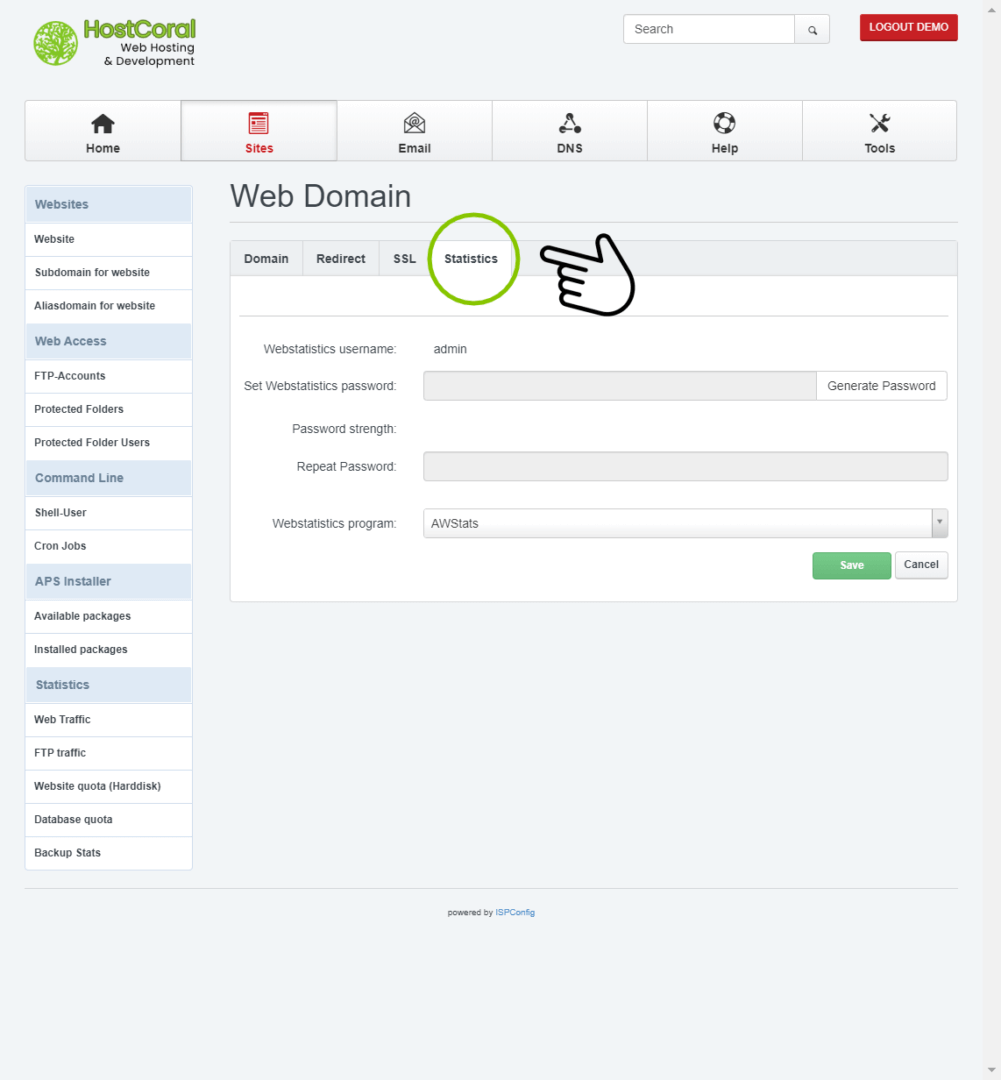
6. Statistics
- Webstatistics username – Your username required to login to view your website’s stats
- Set Webstatistic password – Set a password to access your website’s statistics
- Password strength – strength of your current password
- Repeat password – Fill in your password
- Webstatistics program – Select the necessary software to view your statistics.
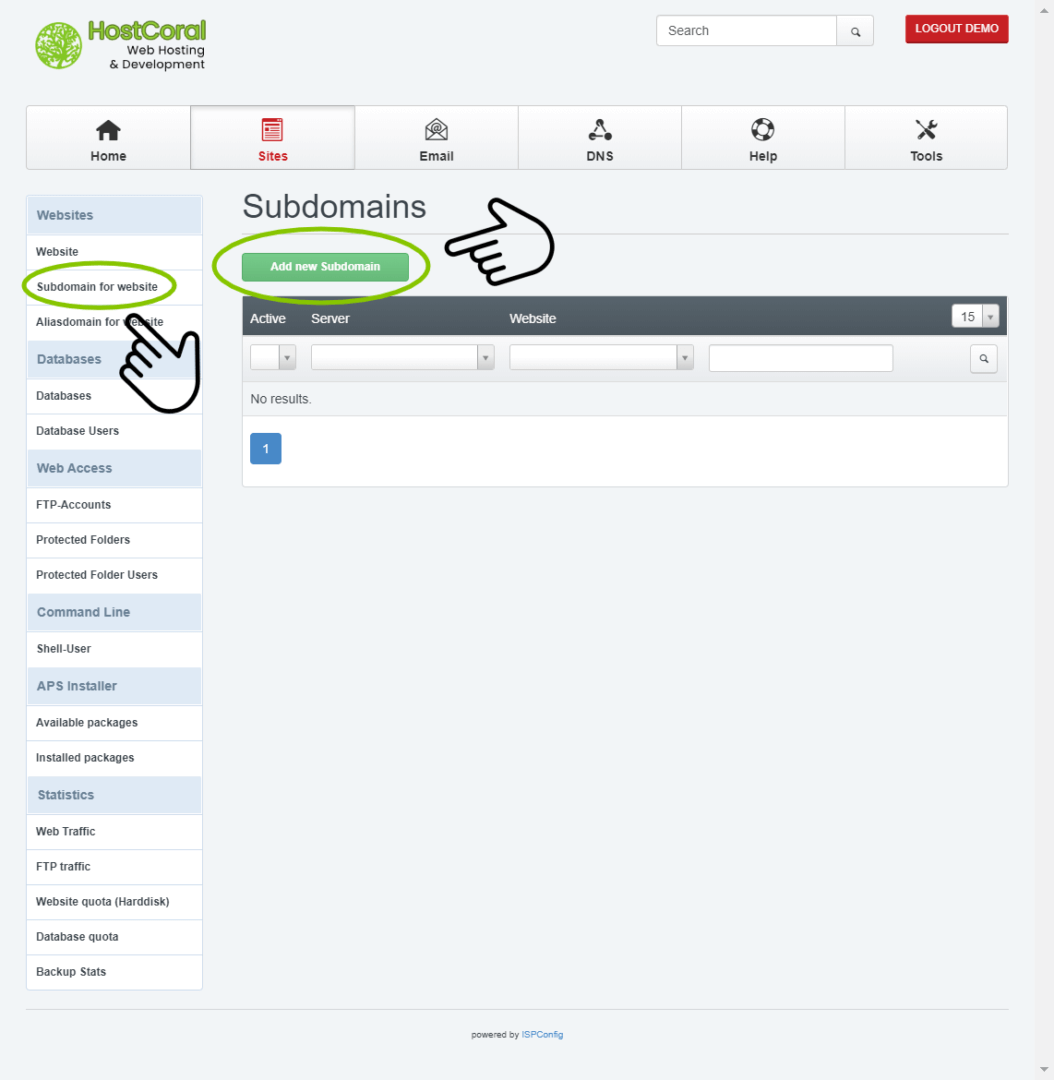
6a. Subdomains – click on the “subdomain for website” link located on the left side of your sidebar under “Websites” to add a subdomain to your website.
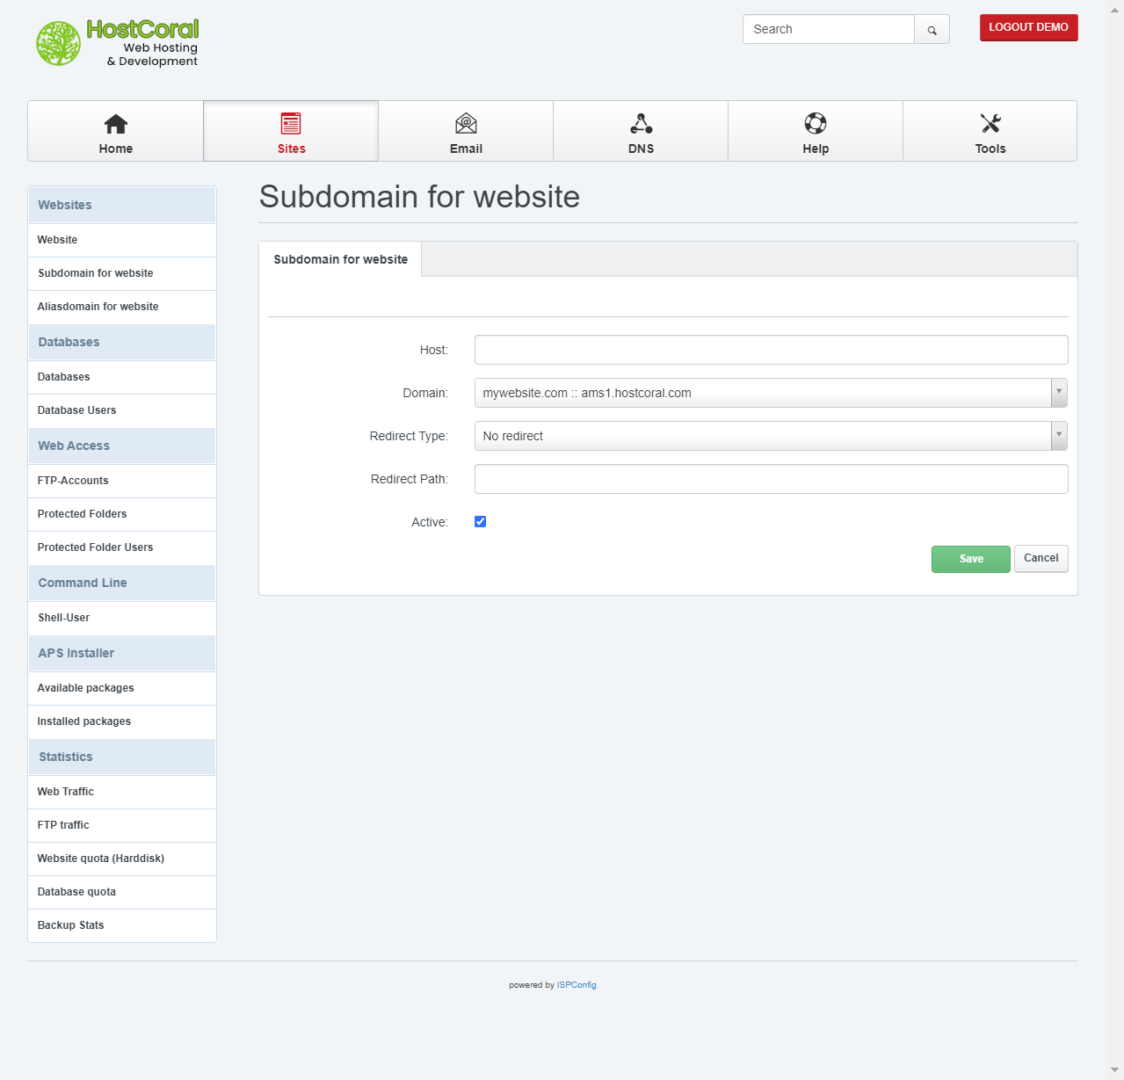
6b. Subdomains
- Host – Fill in the subdomain only for your required subdomain. For example ; for the subdomain “https://subdomain.mywebsite.com”, fill in “subdomain”
- Domain – Select the domain from your current active list of website domains to which the subdomain belongs. If your required website is not available, see step 3 and make sure “Active” is checked
- Redirect Type – Select your redirect type if your subdomain is simply just a redirect to an alternate website
- Redirect Path – Fill in the full URL for the alternate website, for example; “https://myotherwebsite.com”
- Don’t add to Let’s Encrypt certificate – If you have Let’s Encrypt active for your current site and an SSL certificate if not necessary, for instance, when creating a CDN or file server. Check this option to skip requesting a certificate for the subdomain
- Active – Check to enable. Enabled by default. If this option is not enabled, your subdomain will not be available
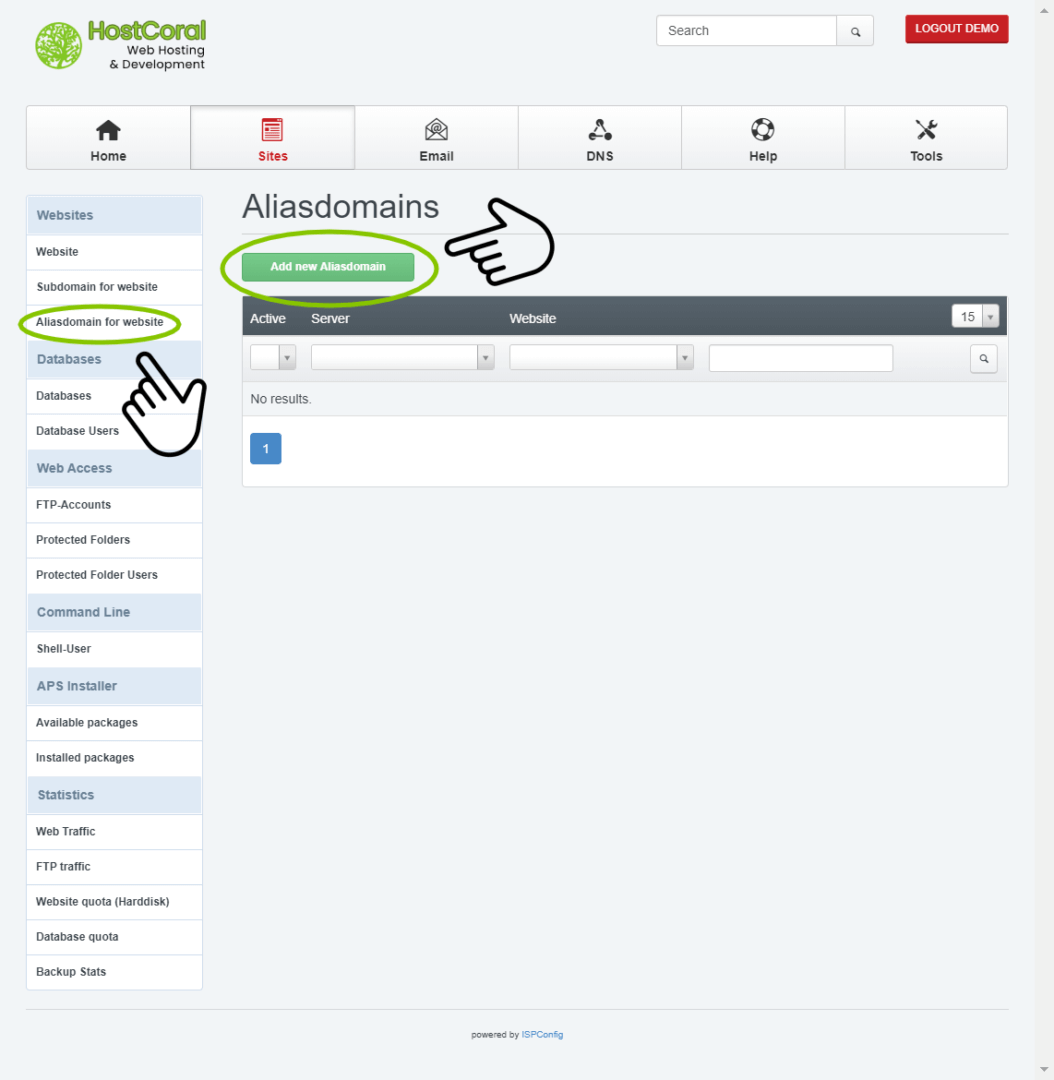
7a. Aliases – click on the “Aliasdomain for website” link located on the left side of your sidebar under “Websites” to add a aliasdomain to your website.

7b. Aliases
- Domain – Type full URL of the needed alias domain, for example; “https”//mywebsite.com”
- Parent Website – Select the domain from your current active list of website domains to which the aliasdomain belongs. If your required website is not available, see step 3 and make sure “Active” is checked
- Redirect Type – Select your redirect type if your aliasdomain is simply just a redirect to an alternate website
- Redirect Path – Fill in the full URL for the alternate website, for example; “https://myotherwebsite.com”
- Auto-Subdomain : This field is set to “www” and is recommended to leave as is
- SEO Redirect – Select an SEO redirect to let browsers know the type of redirect you are implementing. “No redirect” by default
- Don’t add to Let’s Encrypt certificate – If you have Let’s Encrypt active for your current site and an SSL certificate if not necessary, for instance, when creating a CDN or file server. Check this option to skip requesting a certificate for the aliasdomain
- Active – Check to enable. Enabled by default. If this option is not enabled, your aliasdomain will not be available