How to create a new email for my website
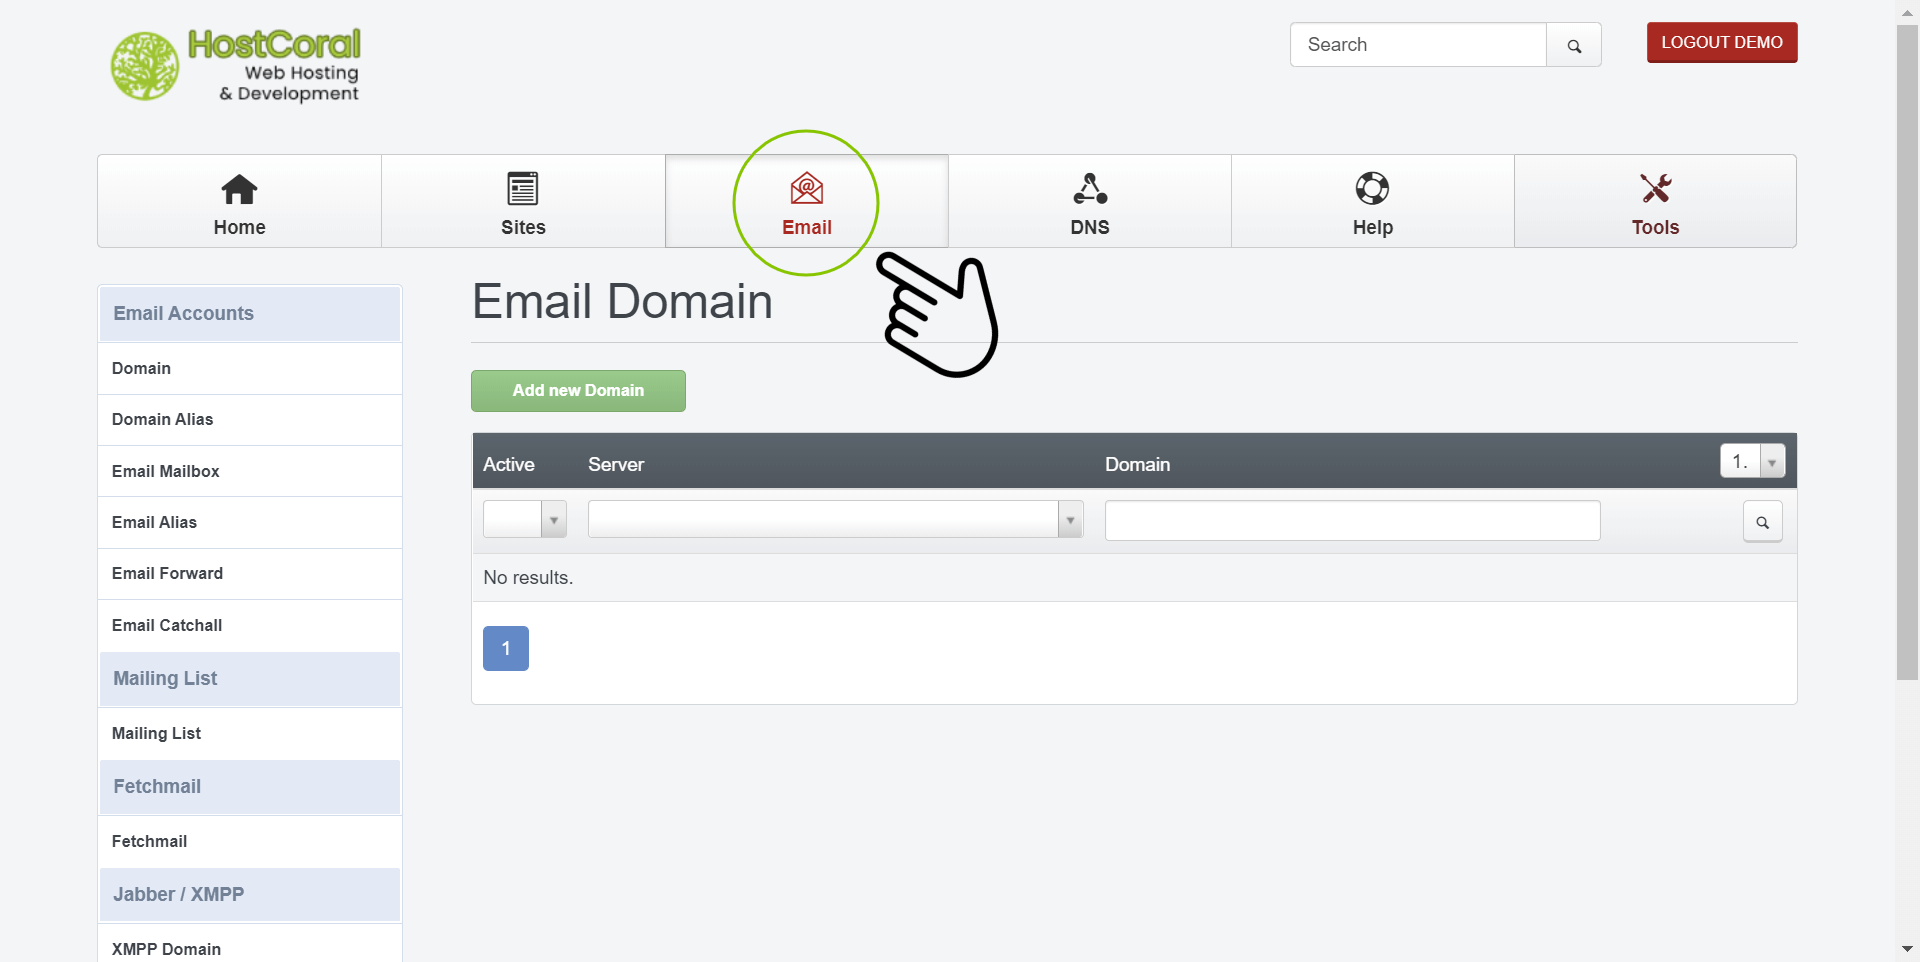
- Dashboard – To get started, login here to your control panel. After logging in, click on the “Email” tab/button at the top of your dashboard.
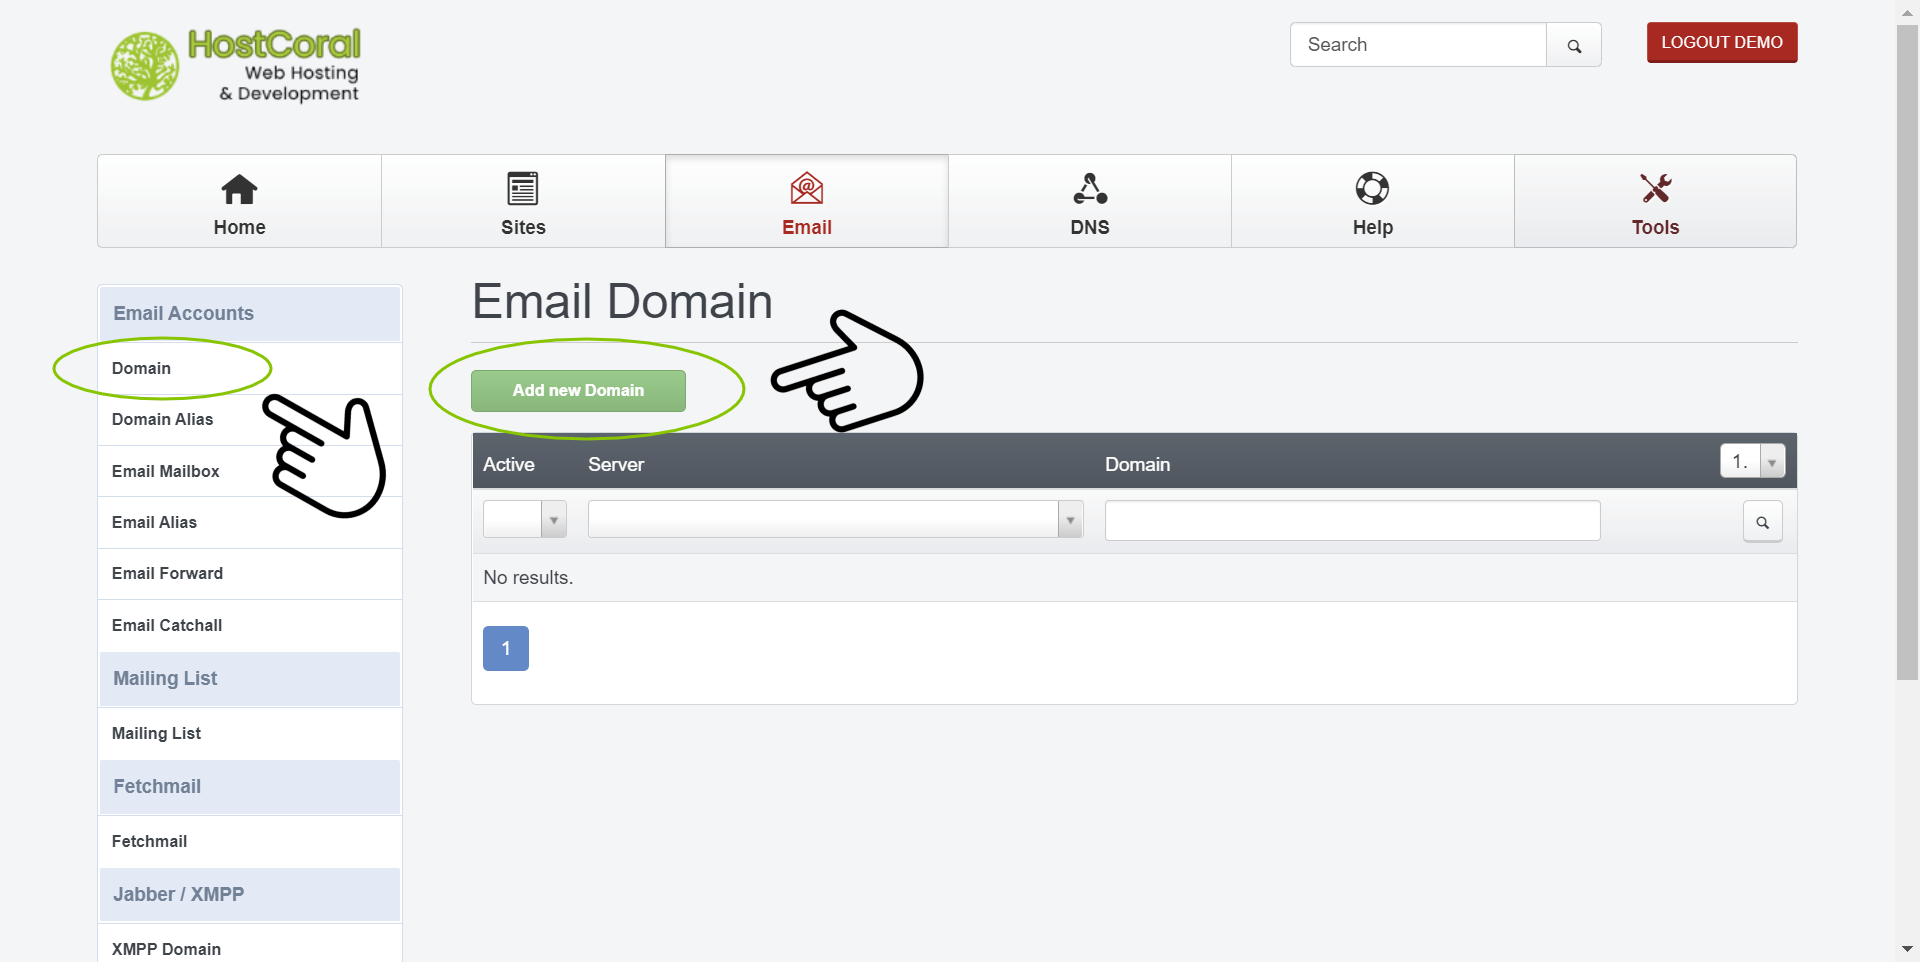
2a. Email Domain – Click on the “Add new Domain” button to get started setting up your new email domain. If this screen is not available, click on the “domain” button via the left side bar under the “Email Accounts” section
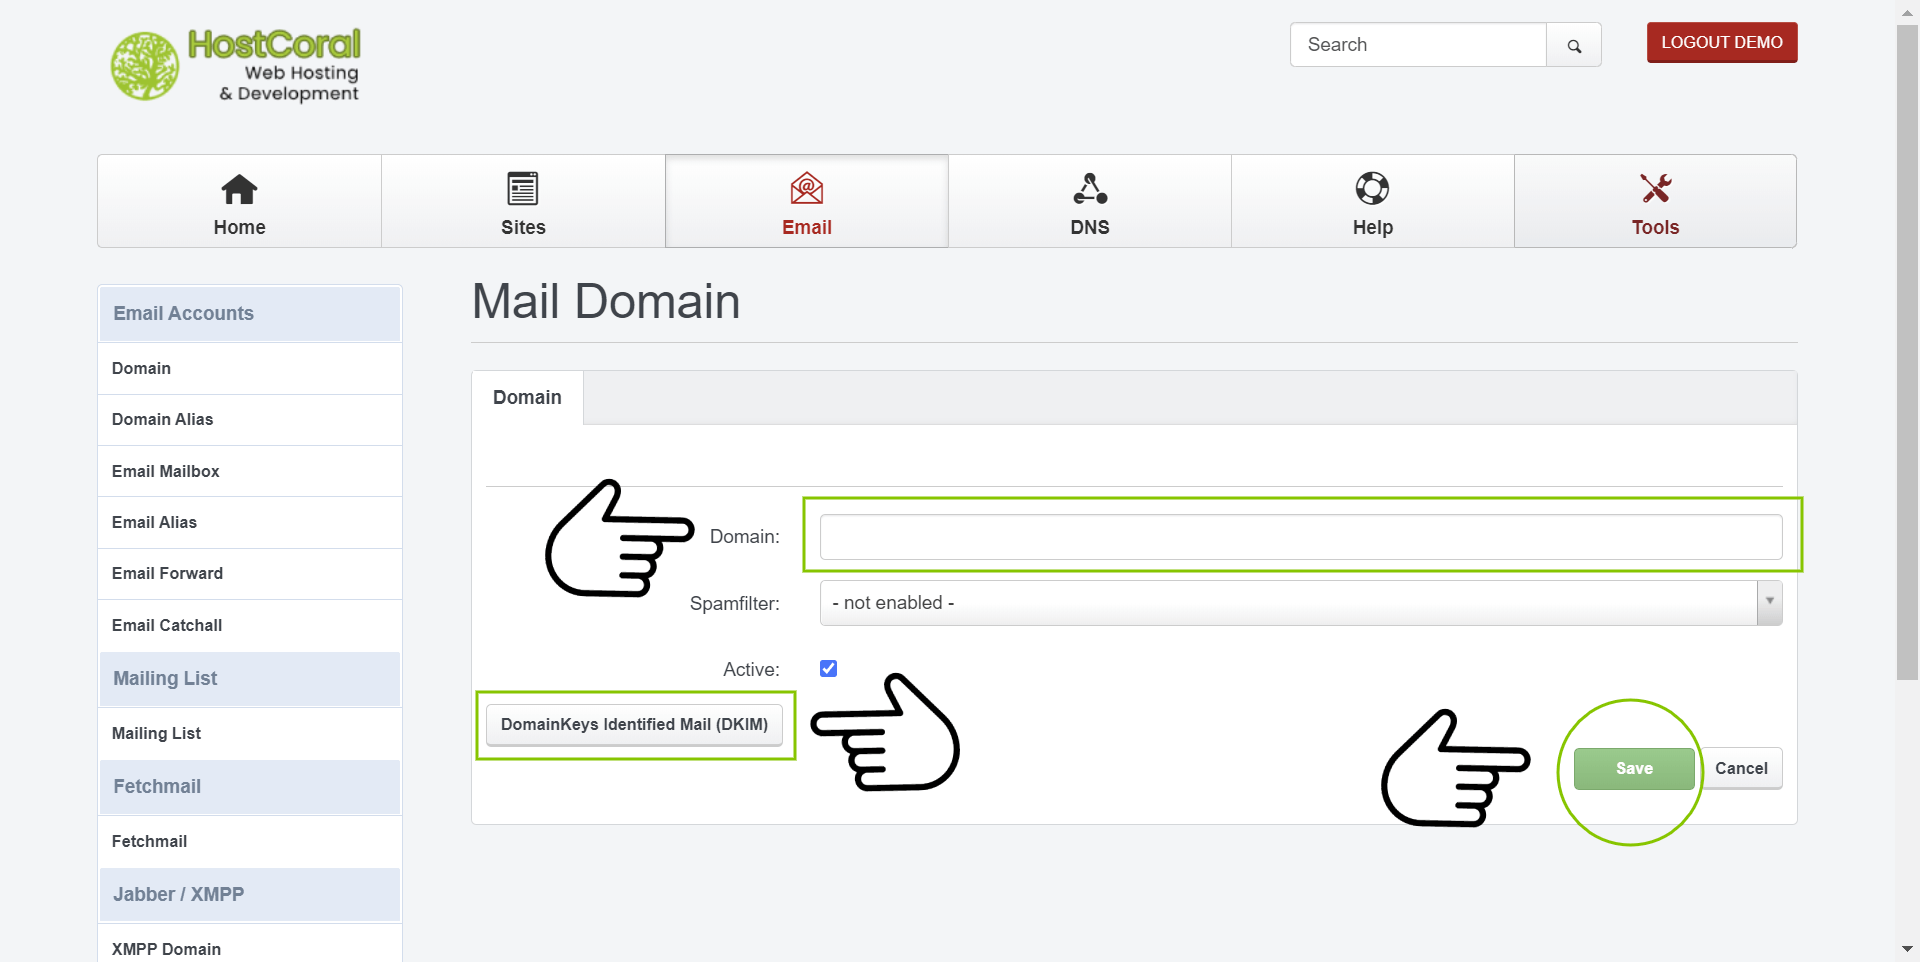
2b. Mail Domain
- Domain – Fill in the address of the website you are trying to add, example; “mywebsite.com”. make sure to exclude all white spacing. Only one email domain can be set per website domain. If this already exists, please skip this step.
- Spamfilter – We recommend setting this to “normal” to enable email spam protection.
- Domain – Fill in the address of the website you are trying to add, example; “mywebsite.com”. make sure to exclude all white spacing
- Active : Make sure this option is checked. If unchecked your email domain will not be available
- DomainKeys Identified Mail (DKIM) – Click to enable if you need DKIM verification for your email domain. To enable DKIM, you must already have your domain’s DNS information setup and running. Click here if is not.
DKIM-Selector should remain as “default”. Make sure the “enable DKIM” option is checked. Click on the “Generate DKIM Private-key” button to generate your DKIM key
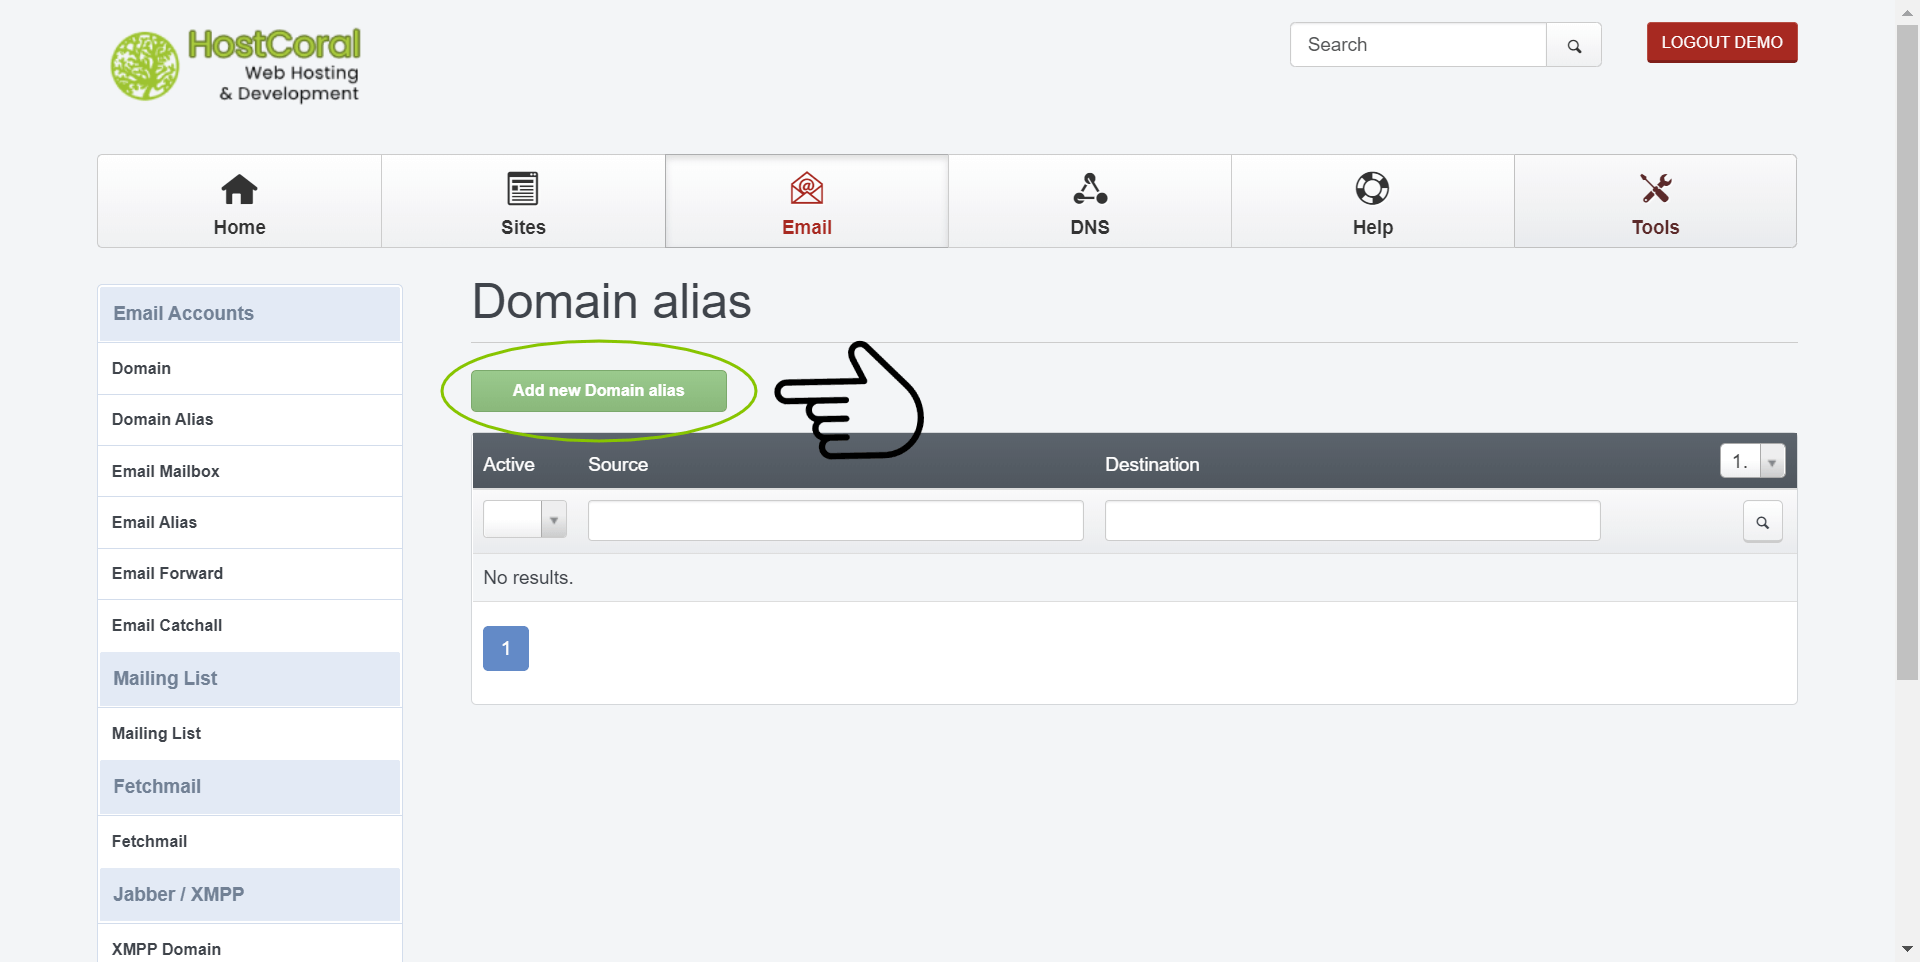
3a. EMail Domain Alias – Click on the “Add new Domain alias” button
This is optional
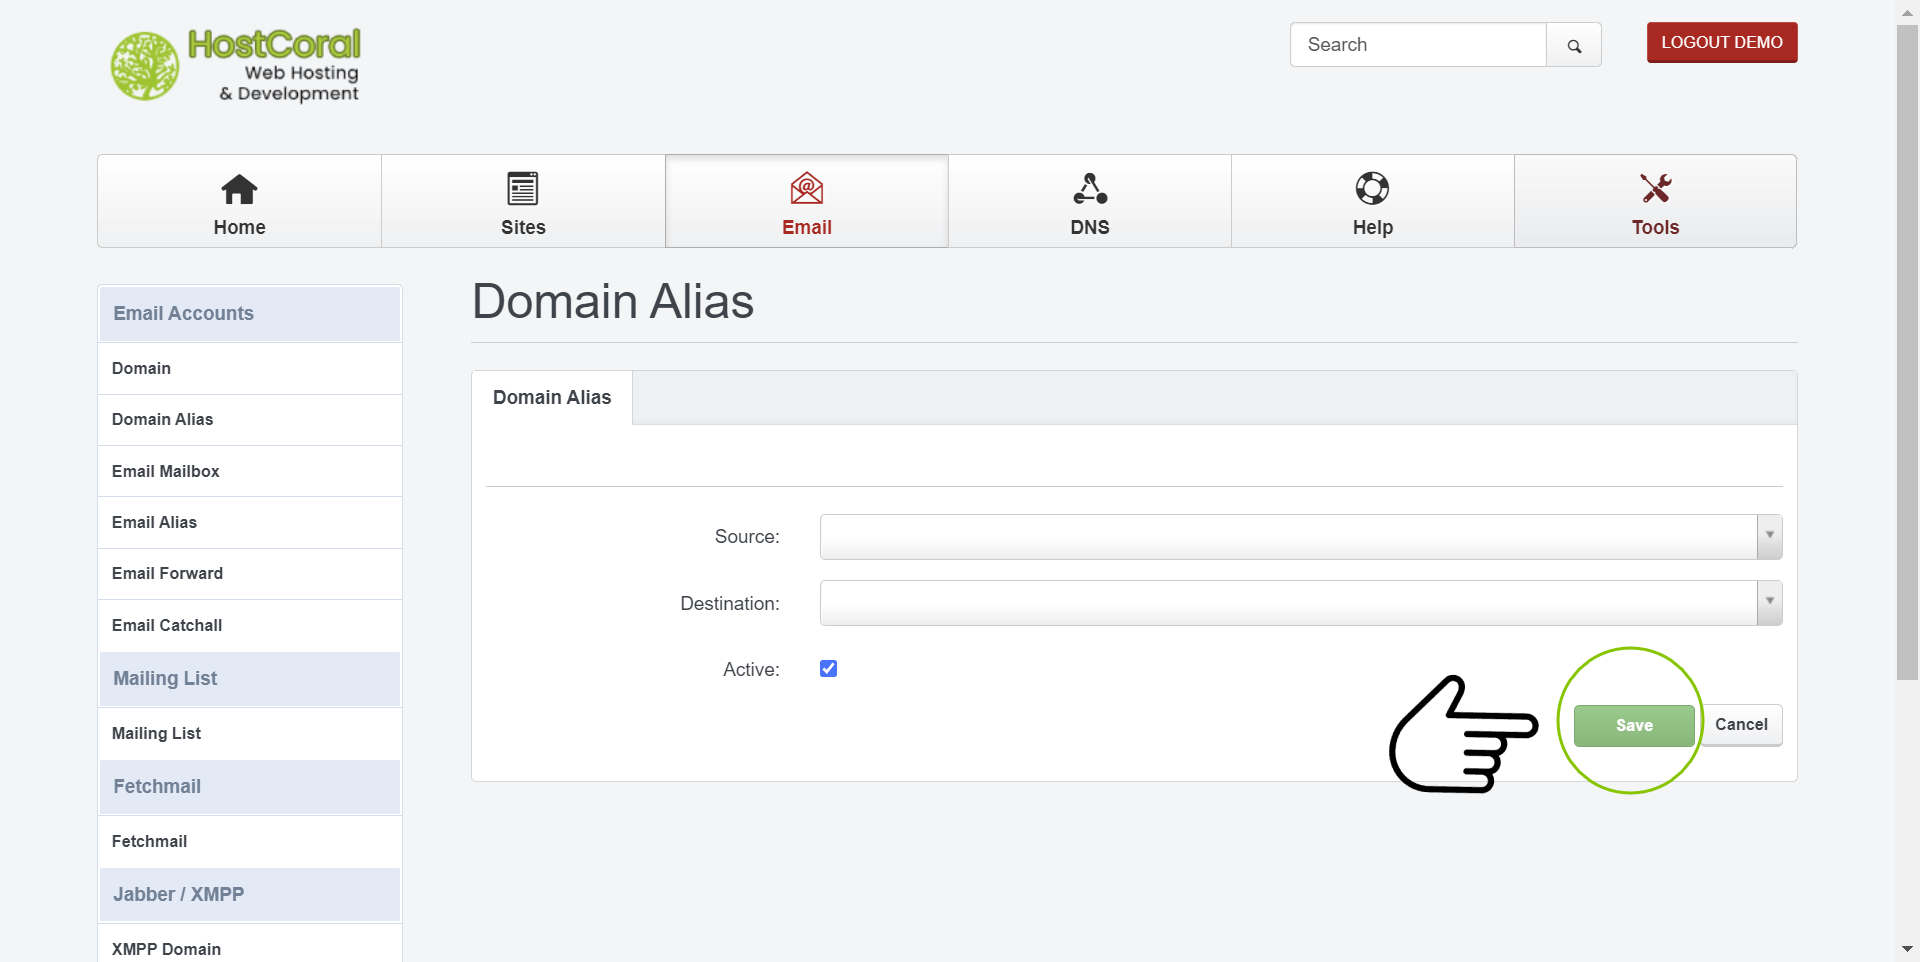
3b. EMail Domain Alias
This is optional
- Source – Select the source for your email alias
- Destination – Select the destination for your email alias
- Active – Make sure this option is checked. If unchecked your email domain alias will not be available
- Make to sure to save the changes you made
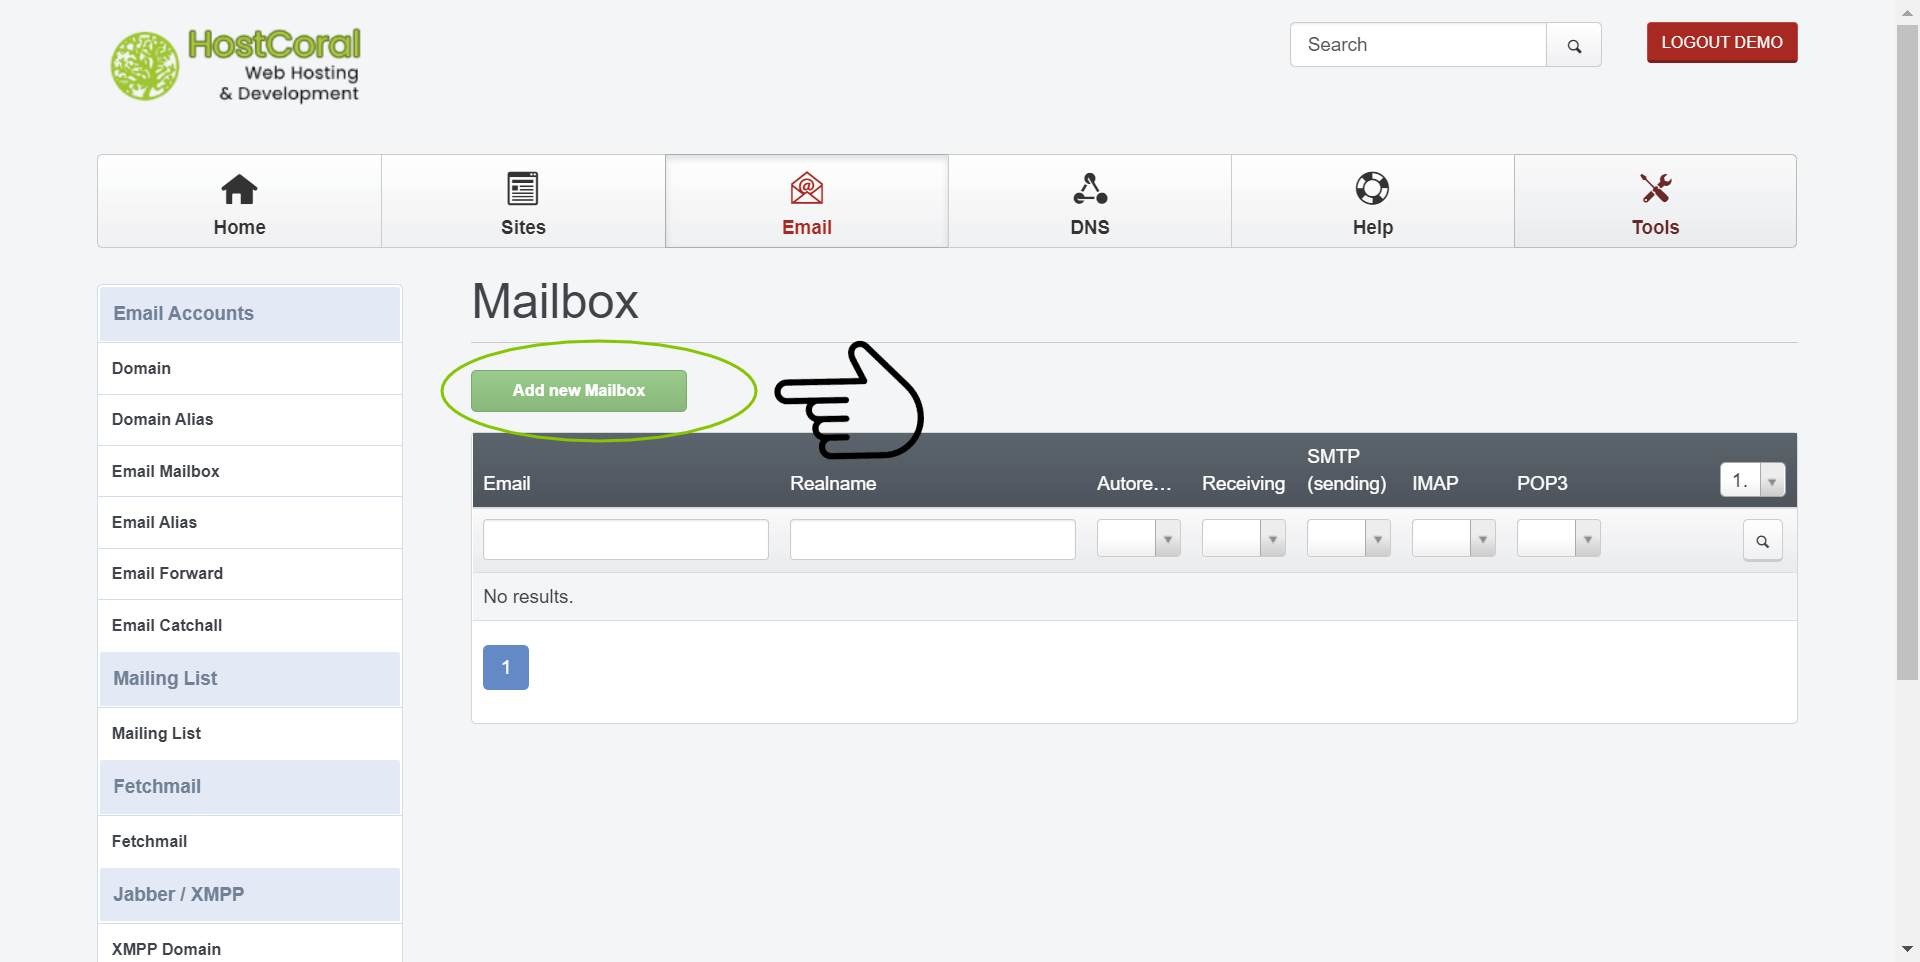
4a. Mailbox – Click on the “Add new Mailbox” button
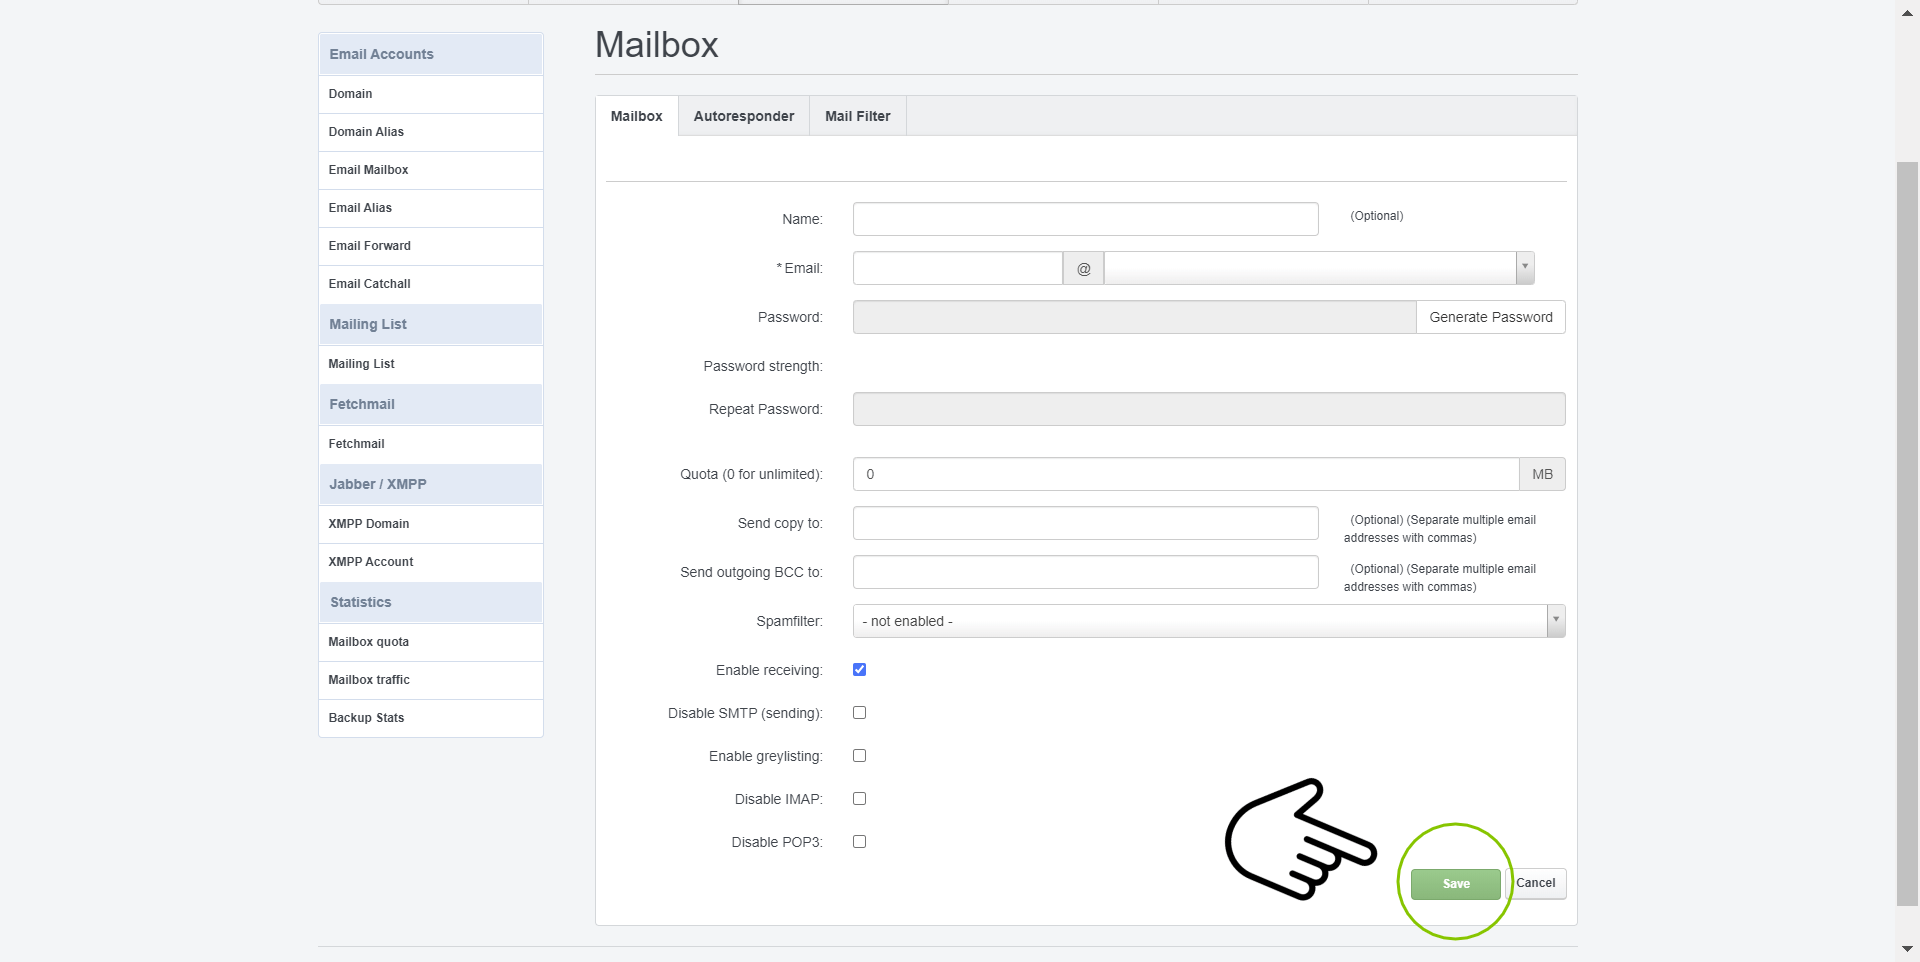
4b. Mailbox
- Name (optional) – Choose a name for the mailbox
- Email – Type the name of the mailbox you would like to create and select the email domain after the “@” symbol. For example; to create the domain “info@mywebsite.com”, type “info” and select “mywebsite.com” from the domain selector
- Password : A password is required for your new email mailbox. Type your own password or click on the “Generate Password” button. Your password must meet the minimum requirements, if not it will give an error.
Password Minimum Requirements
Your password must contain at least 1 capital letter, symbol, lower letter and numerical character. - Password strength – Indicates the strength of your current password. If will show if our password is weak, strong, or very strong. Password should meet the “very strong” status.
- Repeat password – This password must match the previous Password field to ensure both passwords do match and decrease the chances of typing the incorrect password.
- Quota – Set the max size limit of your mailbox. Set it to 0 for no limitations
- Send copy to – Send a copy of every email received at the email mailbox you are creating to an already existing email address.
- Send outgoing BCC to – Send a BCC copy of every email received at the email mailbox you are creating to an already existing email address
- Spamfilter – We recommend setting this option to “normal” to enable spam email protection
- Enable receiving – Receive emails at the email address you are creating. Enabled by default.
- Disable SMTP (sending) – Check this option and disable sending email from the email you are creating
- Enable greylisting – Check this option to enable grey-listing.
- Disable IMAP – Check this option to disable all IMAP services for your mailbox
- Disable POP3 – Check this option to disable all POP3 services for your mailbox
- Make to sure to save the changes you made
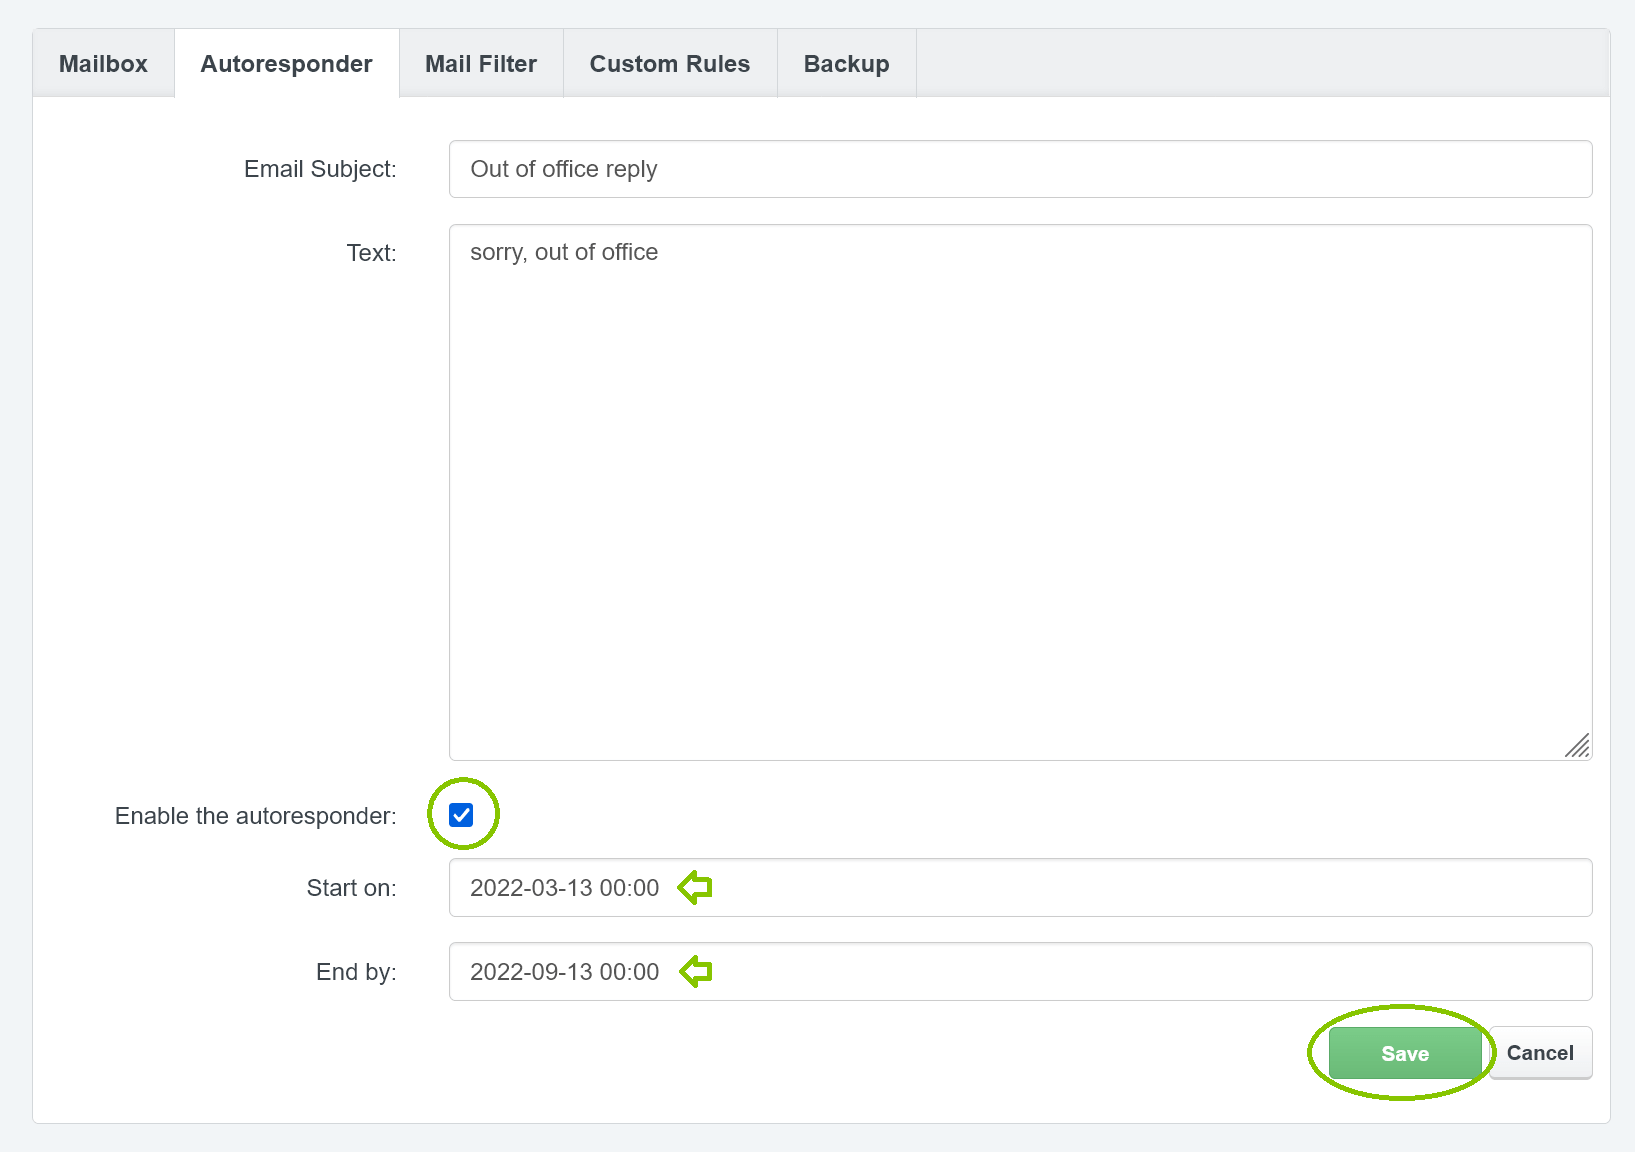
5. Autoresponder
This is optional
- Email Subject – Type a subject for the auto-respond email
- Text – Type the body text of the email
- Enable the autoresponder – Make sure this optioin is checked or the auto-respond email will not be active
- Start on – Click on the input field and select a date from the pop-up calendar. The auto-respond email will only be available starting from the selected date
- End by : The auto-respond email will not be available starting from the selected date
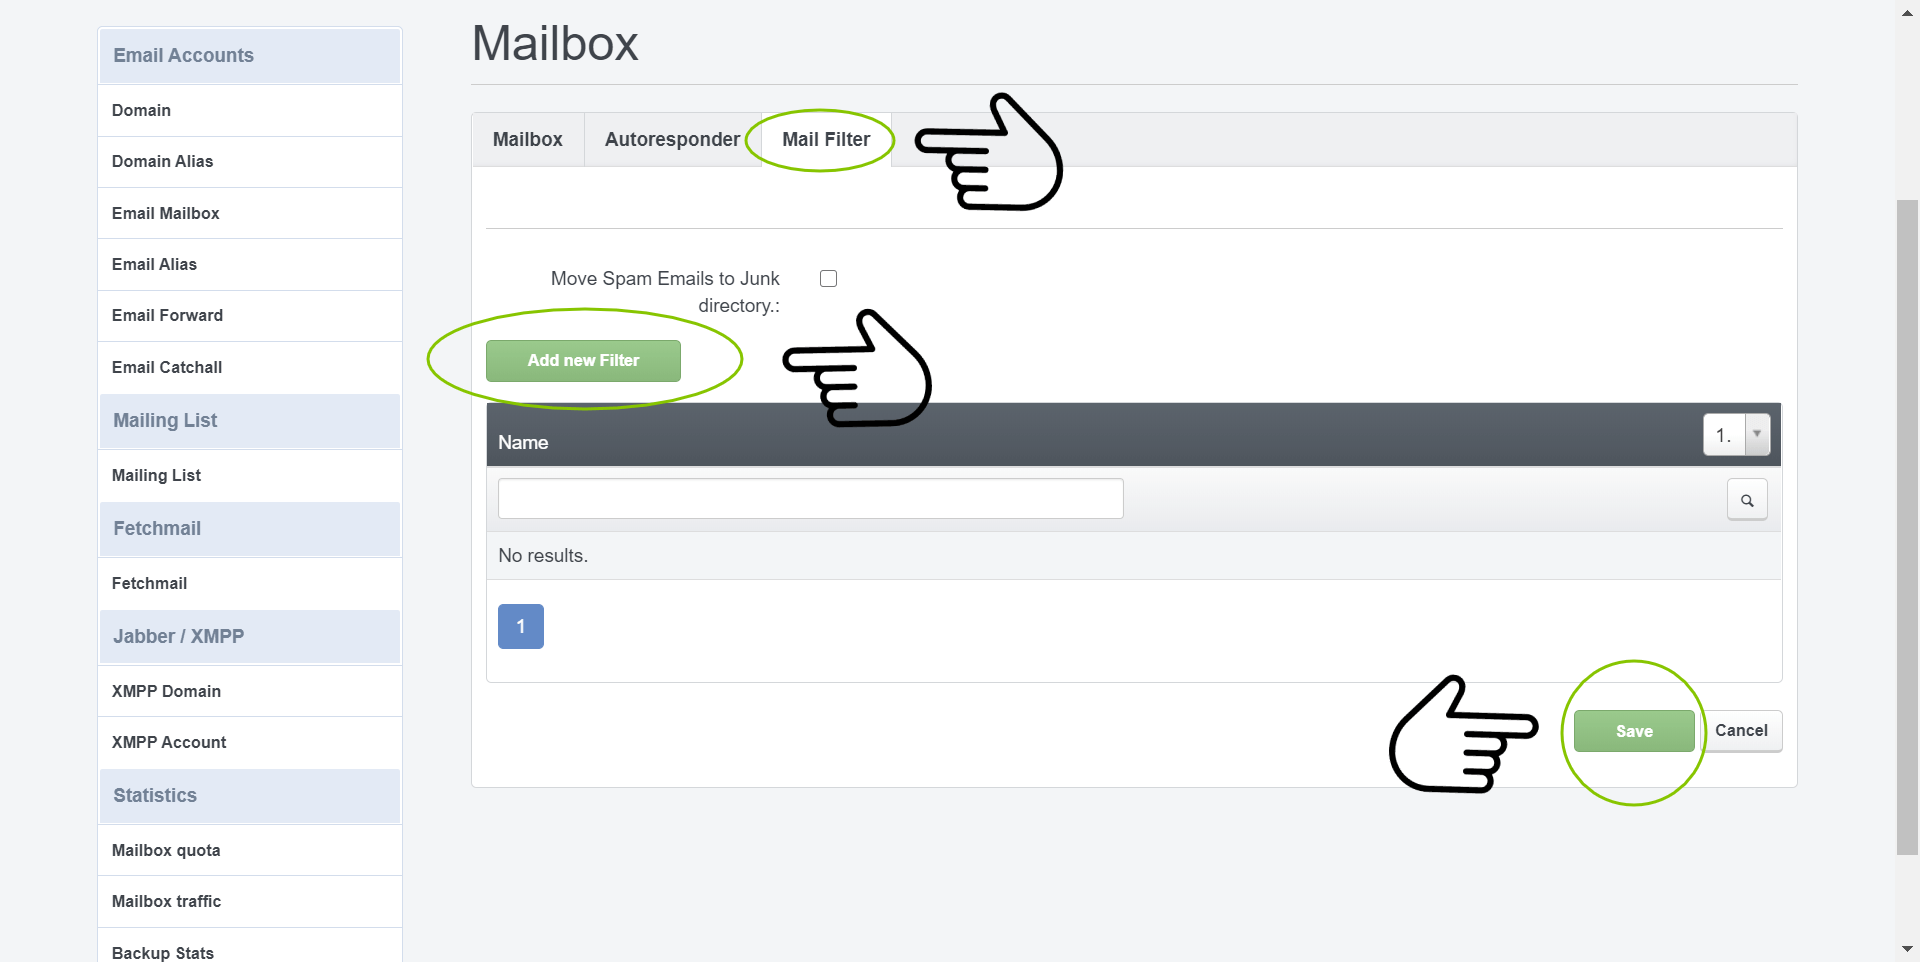
5a. Mail filter
This is optional
Click on Mail filter tab to get started setting up mail filters. Then, click on the “Add new Filter” to add a new mail filter rule to your mailbox
This is optional
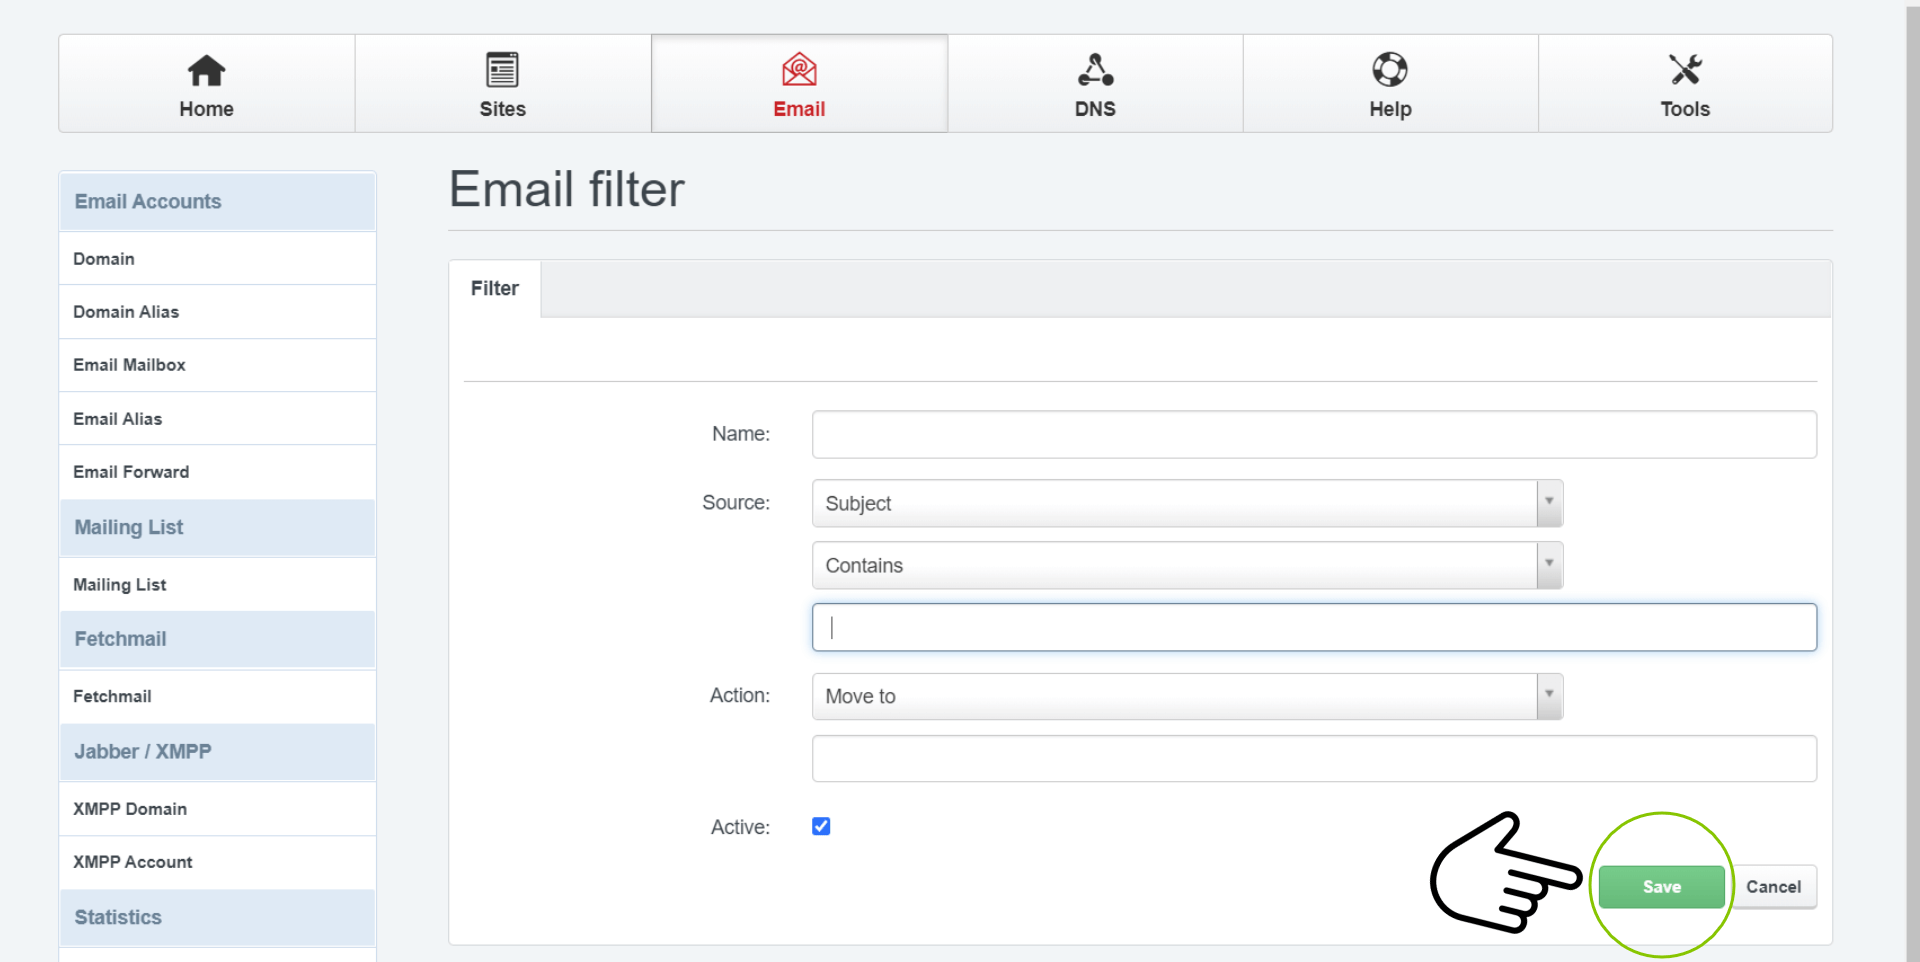
5b. Mail filter
This is optional
- Name – Name of the new mail filter
- Source – Select a source from which the script will read to identify undesired mails
- Contains (default) – Select the way on how the script must recognize the undesired mail
- Type the text which the script will use to recognize undesired mails
- Action – Choose what action must be taken when an undesired mail has been identified
- Active – Make sure this option has been checked or the mail filter will not be active
- Don’t forget to save your settings
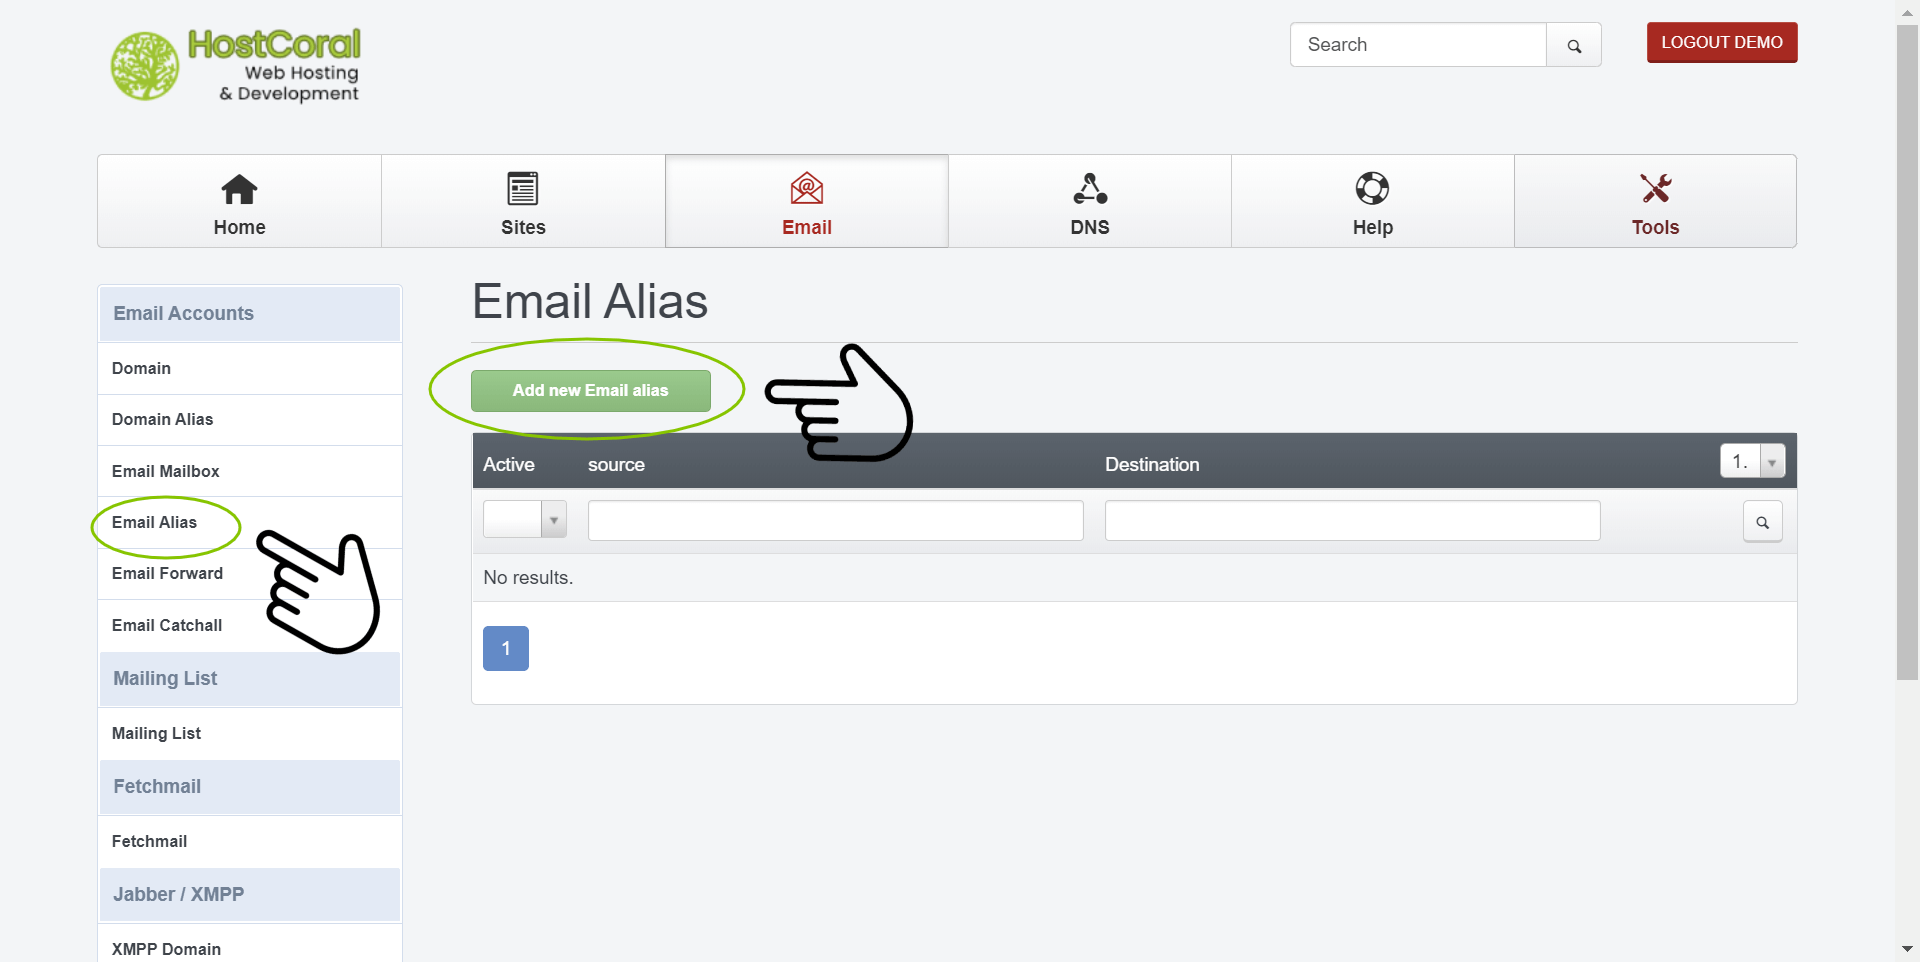
6a. Email Alias
This is optional
Click on “Email Alias” on the left sidebar under “Email Accounts” section to get started setting up email aliases. Then, click on the “Add new Email Alias” to add a new email alias to your mailbox
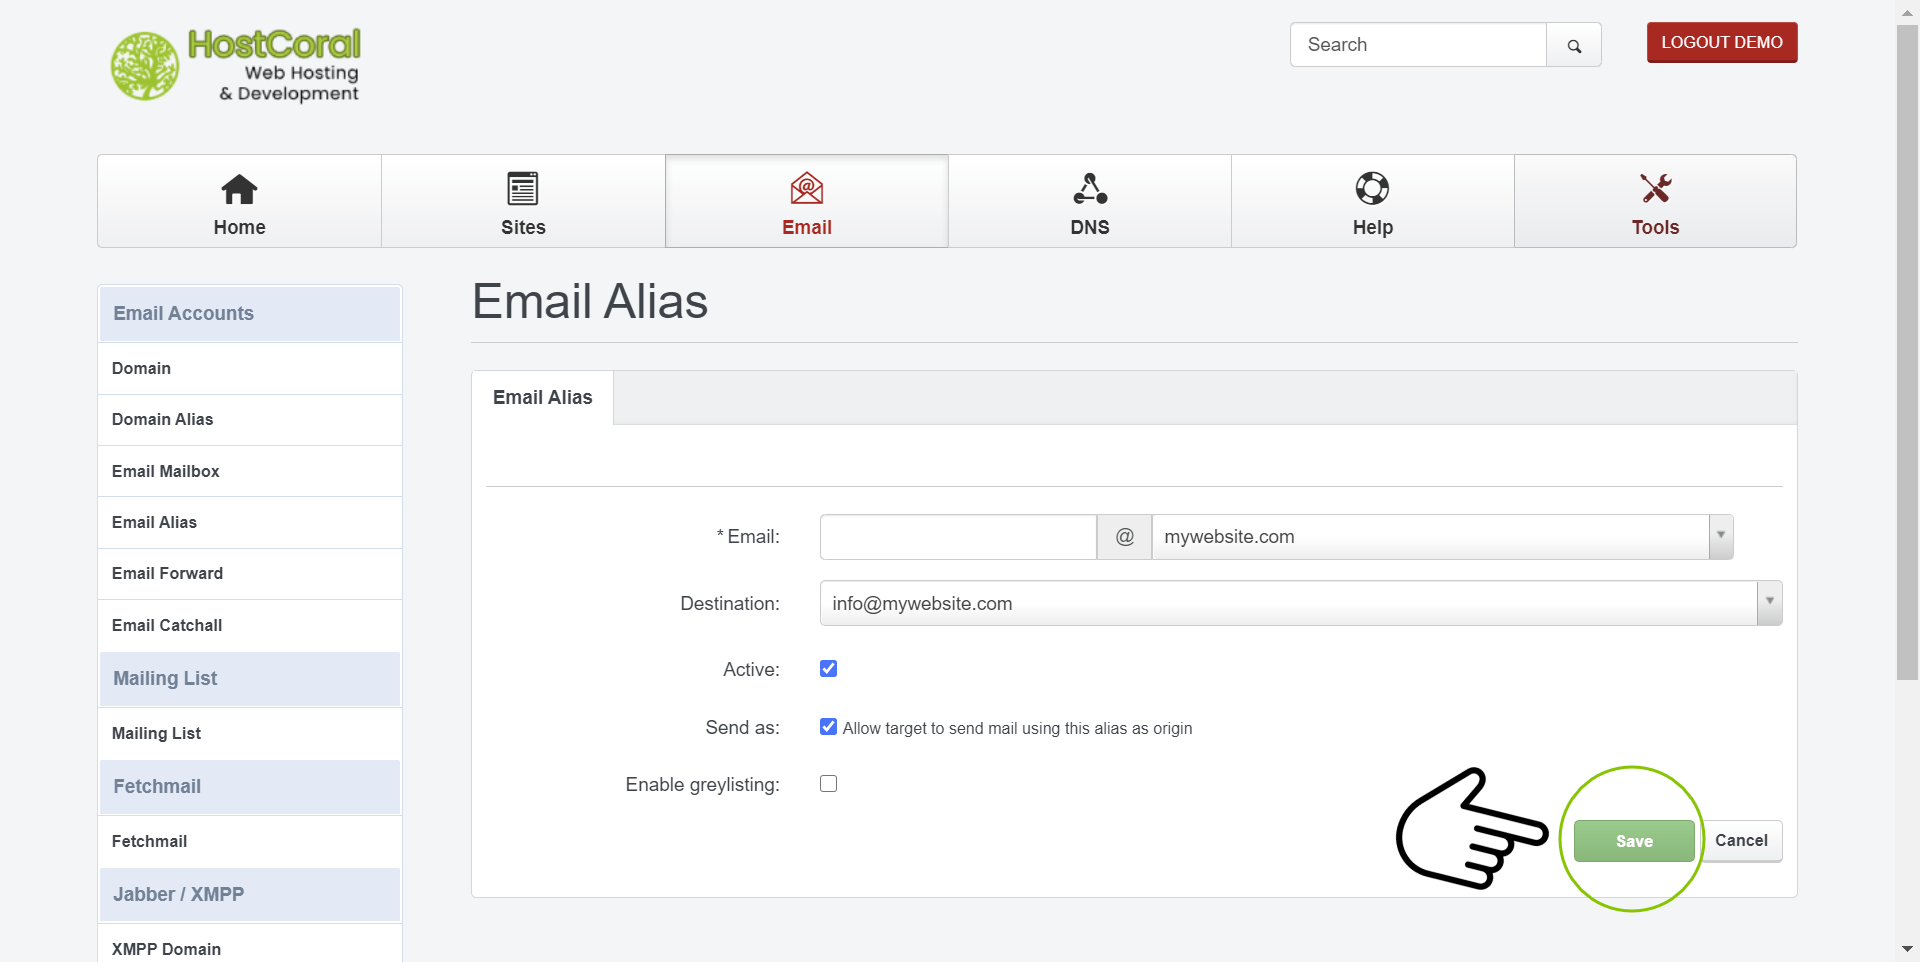
6b. Email Alias
This is optional
- Email – Type the name of the alias you would like to create and select the email domain after the “@” symbol. For example; to create the domain “info@mywebsite.com”, type “info” and select “mywebsite.com” from the domain selector
- Destination – Select the email alias destination for your email alias
- Active – Make sure this option is checked. If unchecked your email alias will not be available
- Send as – Allow target to send mail using this alias as origin
- Enable greylisting – Make sure this option is checked if you need to enable grey-listing
- Don’t forget to save your settings
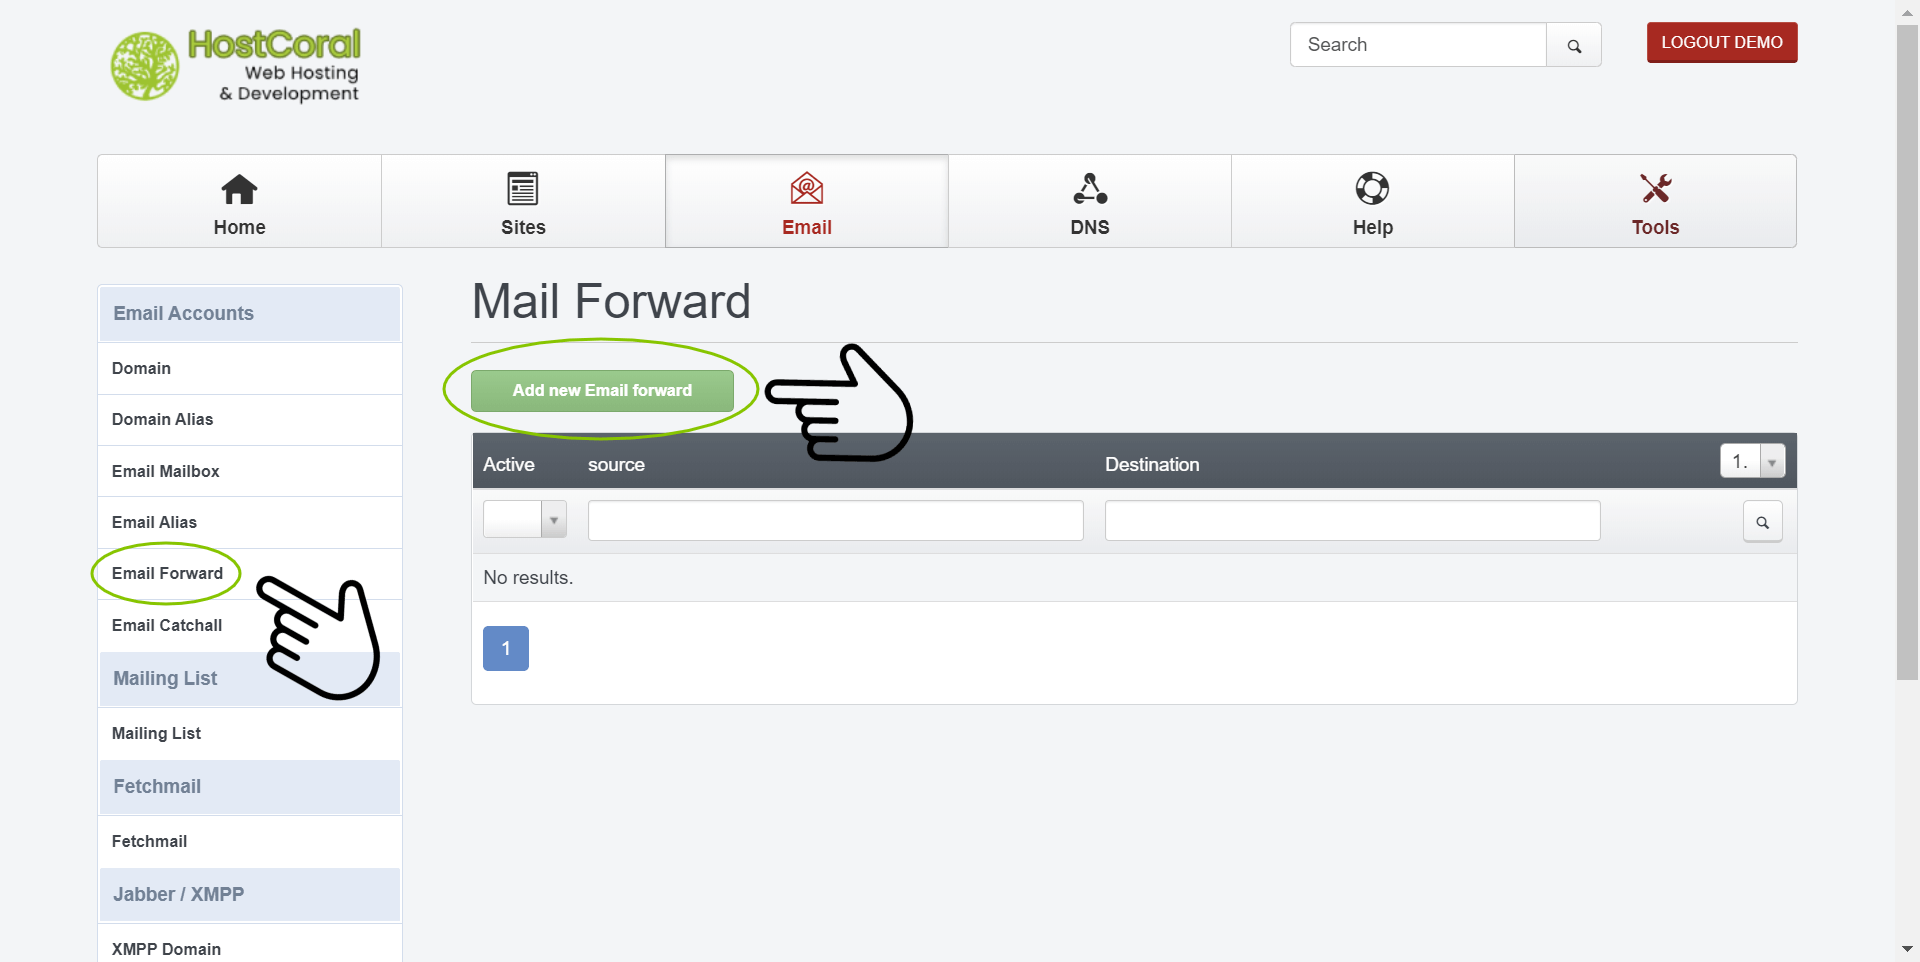
7a. Mail Forward
This is optional
Click on “Email Forward” on the left sidebar under “Email Accounts” section to get started setting up email forwards. Then, click on the “Add new Email forward” to add a new email forward to your mailbox
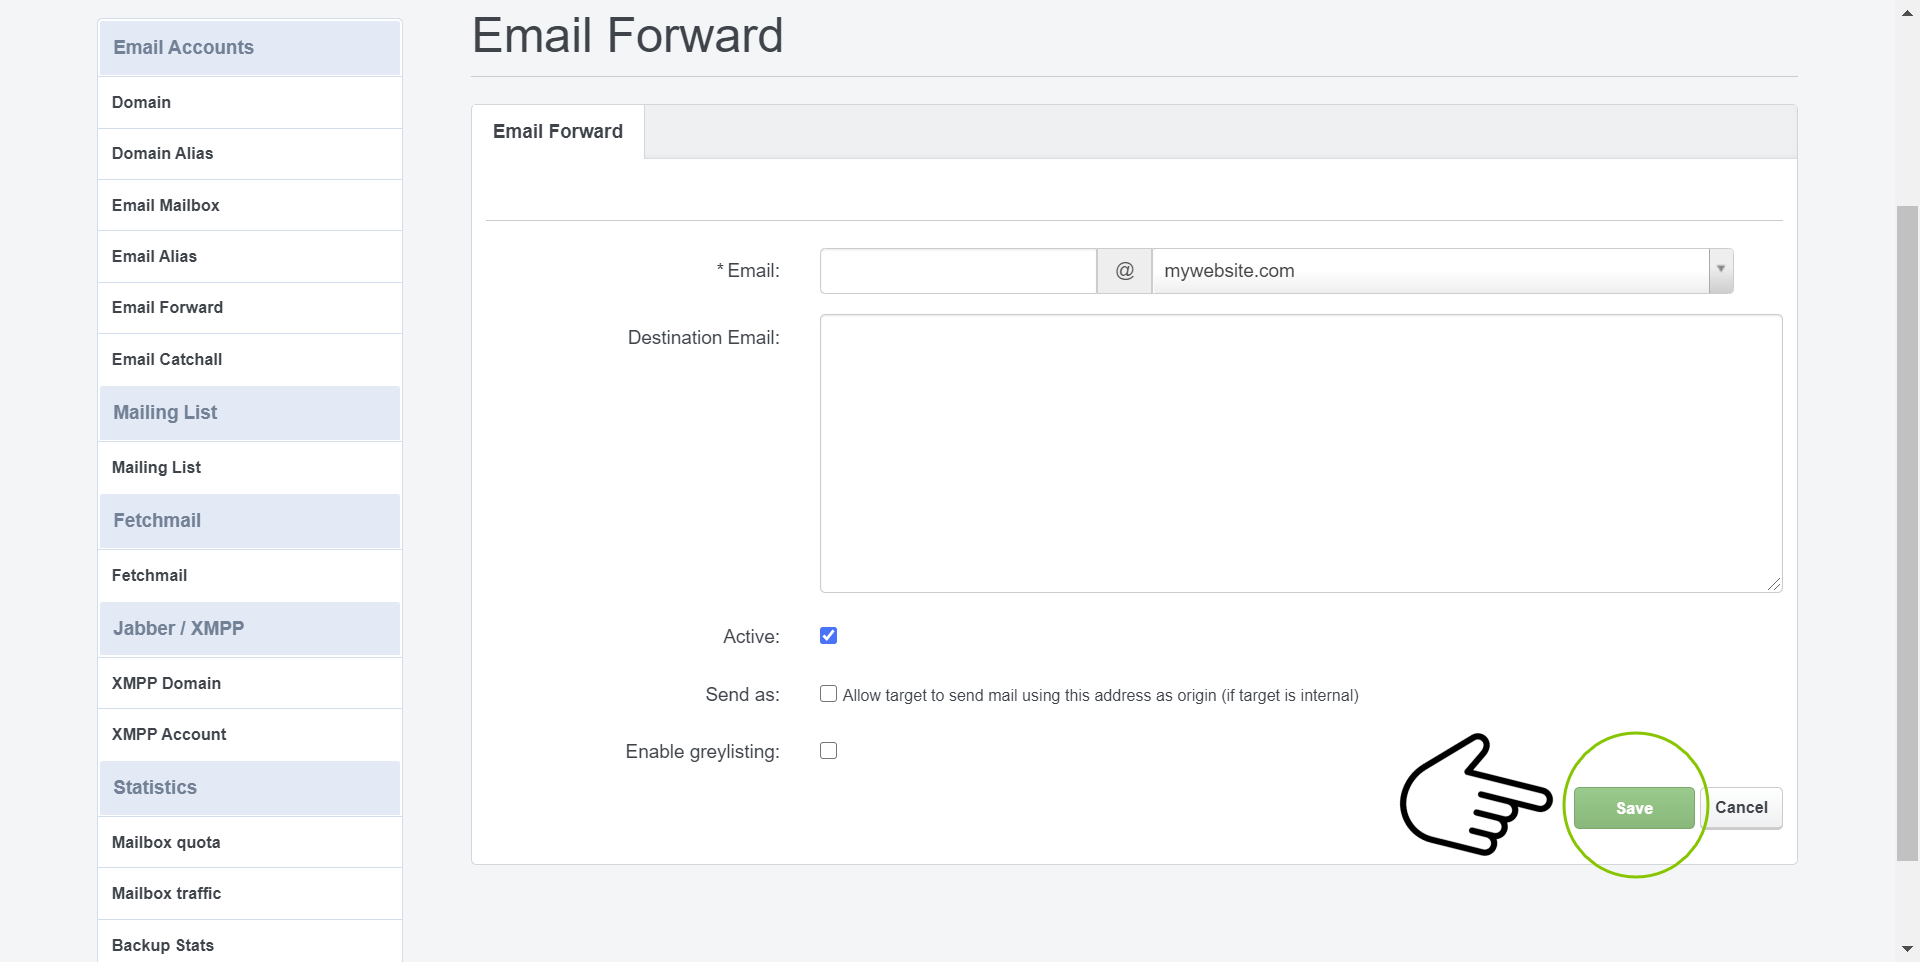
7b. Mail Forward
This is optional
- Email – Type the name of the email forward you would like to create and select the email domain after the “@” symbol. For example; to create the domain “info@mywebsite.com”, type “info” and select “mywebsite.com” from the domain selector
- Destination Email – Type the email forward destination for your email alias
- Active – Make sure this option is checked. If unchecked your email forward will not be available
- Send as – Allow target to send mail using this email forward as origin
- Enable greylisting – Make sure this option is checked if you need to enable grey-listing
- Don’t forget to save your settings
8a. Email Catchall
This is optional
Email catchall is only available in certain hosting packages. Check plans to see if your plan supports email catchalls. Click on “Email Catchall” on the left sidebar under “Email Accounts” section to get started setting up email catchalls. Then, click on the “Add new Catchall” to add a new email catchall to your mailbox
8b. Email Catchall
This is optional
- Source – Select the source domain for your email catchall
- Destination Email – Type the email forward destination for your email alias
- Active – Make sure this option is checked. If unchecked your email forward will not be available
- Don’t forget to save your settings
After setting p your new email, you can sign into your email via our online webmail platform or you can setup your SMTP credentials with your own email application, for example; android, outlook, etc….by following our setup guide.